How Do You Plant an Asparagus Bed for a 20-Year Harvest?
By Jim Vernon · 9 min read · Last updated
You will spend a weekend digging trenches, but you will spend the next two decades cutting fresh, crisp spears from the exact same soil.
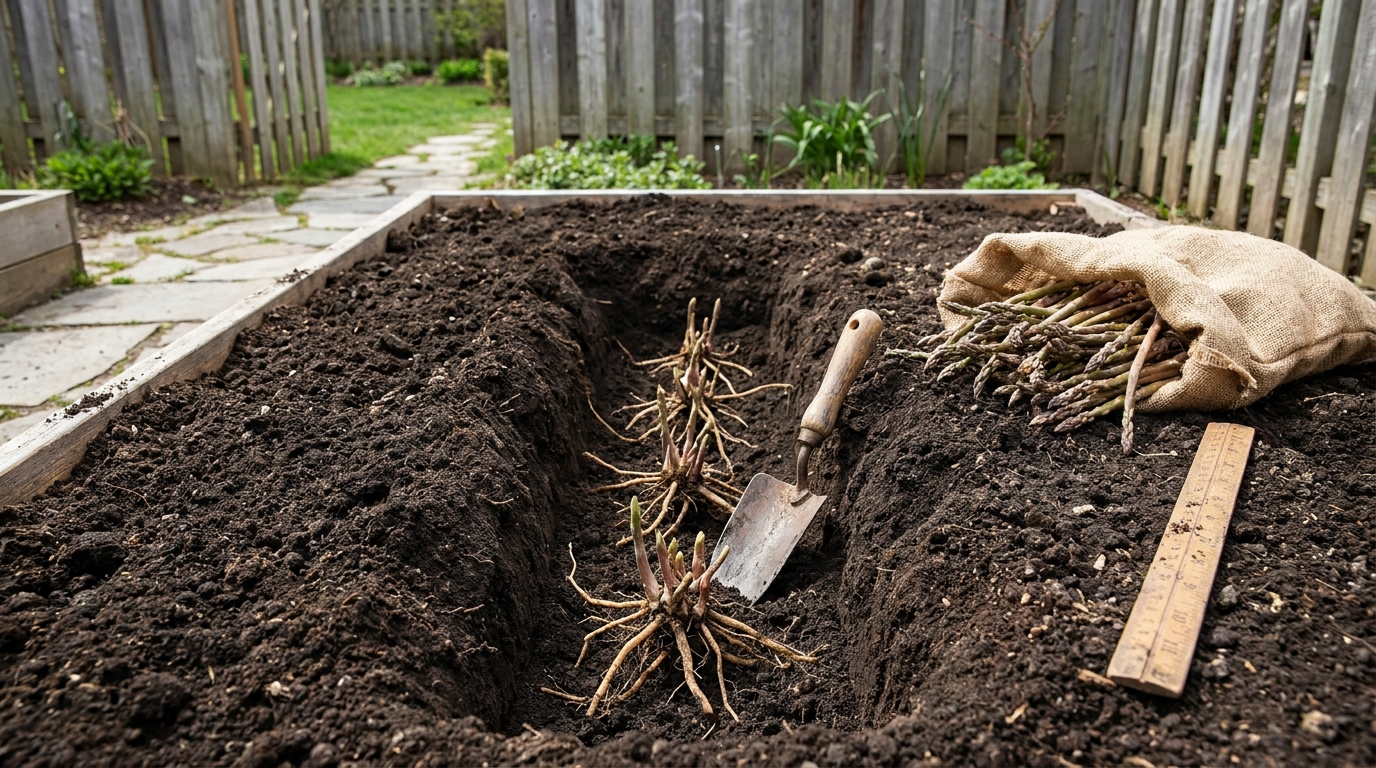
Plant bare-root asparagus crowns in a trench 6 to 8 inches (15 to 20 cm) deep during early spring when soil temperatures reach 50°F (10°C). By slowly backfilling the trench as the initial spears grow, you encourage an extensive, deep root system capable of producing heavy yields for 15 to 20 years. Because you are planting a permanent perennial crop, you must completely eradicate perennial weeds and amend the deep soil layers before a single root goes into the ground. Asparagus thrives in USDA Zones 3 through 8 and demands loose, well-draining soil to prevent the crowns from rotting during wet winters.
- Plant 1-year-old bare-root crowns rather than seeds to accelerate your first harvest by an entire calendar year.
- Amend the bottom of the planting trench with phosphorus before planting, because you cannot rototill the bed later.
- Gradually backfill the trench as the spears grow to prevent the new crowns from suffocating under too much soil.
- Do not harvest a single spear during the first growing season; the ferns must grow to 4 feet (1.2 meters) tall to feed the roots.
- Expect to spend between $30 and $45 in 2026 for a bundle of 25 bare-root crowns, which requires a 37-foot (11.2 m) row to accommodate proper spacing.
What Are Asparagus Crowns, and Why Are They Better Than Seeds?
While you can grow asparagus from seed, doing so adds an entire year of waiting to an already long establishment process. Seeds require intensive indoor lighting early in the winter and delicate transplanting. Instead, purchase 1-year-old bare-root crowns. These dormant root systems look like grayish-brown spiders or octopuses with long, fleshy tentacles. Buying crowns essentially outsources the fragile first year of growth to a commercial nursery.
When purchasing, look for all-male hybrid varieties like Jersey Knight or Jersey Supreme. Asparagus plants have genders, and female plants expend massive amounts of energy producing red berries and seeds that drop and crowd the bed. All-male varieties channel all their energy into producing thicker, more abundant spears. In 2026, a bundle of 25 high-quality crowns costs between $30 and $45. Because each crown requires 18 inches (45 cm) of spacing, a bundle of 25 requires a 37-foot (11.2 m) row, or roughly two 4-by-8-foot (1.2 by 2.4 m) raised beds.
- Buy 1-year-old bare-root crowns to skip the difficult germination and seedling phase.
- Choose all-male hybrids to maximize spear production and prevent seed-drop crowding.
- Space crowns 18 inches (45 cm) apart to allow the mature ferns room to expand.
How Do You Prepare the Soil and Dig an Asparagus Trench?
Because asparagus is a permanent crop that will occupy the same soil for two decades, soil preparation cannot be rushed. You must completely eradicate persistent weeds like Bermuda grass or bindweed before digging. If you leave root fragments behind, the weeds will choke out your asparagus, and you cannot safely rototill an established bed.
This brings up a crucial judgement call where professionals differ from beginners. A beginner will typically spread compost over the topsoil, run a tiller 4 inches (10 cm) deep, and plant the crowns. A pro knows that asparagus roots grow downward and laterally, aggressively seeking nutrients deep in the earth. Because phosphorus does not easily migrate downward through the soil profile, a pro digs a trench 8 to 10 inches (20 to 25 cm) deep and 12 inches (30 cm) wide. They then work a high-phosphorus fertilizer, like bone meal or rock phosphate, directly into the trench floor alongside aged compost. This guarantees the roots have access to essential nutrients for years to come.
- Eradicate all perennial weeds before digging, as you cannot till the bed later.
- Dig a flat-bottomed trench 8 to 10 inches (20 to 25 cm) deep and 12 inches (30 cm) wide.
- Work phosphorus and aged compost into the floor of the trench to feed the deep root system.
- Space parallel trenches at least 3 feet (90 cm) apart to accommodate the large summer ferns.
How Do You Plant the Crowns Without Smothering Them?
Once the trench is prepared and the soil temperature hits 50°F (10°C), it is time to plant. Build small, 2-inch (5 cm) mounds of loose soil and compost at the bottom of the trench every 18 inches (45 cm). Take a dormant crown, spread its fleshy roots out like an umbrella over the mound, and ensure the central bud points straight up.
The most common failure mode for first-time asparagus growers is burying the dormant crowns completely under 8 inches (20 cm) of soil on planting day. The young shoots lack the stored energy to push through that much heavy, wet earth. They suffocate, rot in the trench, and never emerge. To avoid this, cover the crowns with only 2 inches (5 cm) of loose soil. Once the new green shoots grow about 4 inches (10 cm) tall, gently add another 2 inches (5 cm) of soil around them. Repeat this gradual backfilling over the next month until the trench is entirely flush with the surrounding soil grade.
- Drape the roots outward over small mounds at the bottom of the trench.
- Cover the crowns initially with just 2 inches (5 cm) of soil to prevent suffocation and rot.
- Gradually add more soil as the shoots grow until the trench is completely filled.
How Do You Keep Weeds Out Without Damaging the Feeder Roots?
Asparagus plants are notoriously poor competitors. Because they send up their shoots from a centralized crown, invasive weeds easily steal their water and soil nutrients, leading to spindly, pencil-thin spears. Historically, farmers poured heavy amounts of rock salt on asparagus beds to kill weeds, as asparagus is highly salt-tolerant. You should never do this, as salt destroys the surrounding soil structure and severely damages the microbial life.
Instead, rely on aggressive mulching. Once the trench is filled flush with the ground and the ferns are growing, lay down 3 inches (7.5 cm) of clean, weed-free straw or shredded leaves. Never use a hoe or a mechanical cultivator near the base of the plants. Asparagus forms a network of fleshy, shallow feeder roots just beneath the soil surface. Striking them with a garden hoe will create open wounds that invite crown rot. Pull any breakthrough weeds by hand while the soil is damp.
- Never use salt to control weeds, despite old folklore; it ruins the soil composition.
- Apply 3 inches (7.5 cm) of clean straw mulch to block sunlight from weed seeds.
- Hand-pull weeds carefully to avoid slicing the fleshy asparagus roots with a hoe.
What Is the Exact Harvest Schedule for the First Three Years?
Patience is the currency of an asparagus bed. During Year 1, do not cut a single spear. The spears will emerge, stretch, and unroll into 4-foot (1.2 m) tall, feathery green ferns. These ferns are the solar panels of the plant. They must photosynthesize all summer to drag energy back down into the root system to survive the winter.
In Year 2, you may harvest spears that are thicker than a pencil for exactly two weeks. Use a sharp knife to cut them at the soil line, or simply snap them off with your fingers. After two weeks, let all remaining spears grow into ferns. In Year 3, your bed is considered fully established. You can safely harvest all spears for 6 to 8 weeks in the spring. You know it is time to stop harvesting and let the ferns grow when the newly emerging spears drop in diameter and become thinner than a standard pencil.
- Year 1: Zero harvest. Let all spears grow into tall ferns to build root energy.
- Year 2: Harvest spears larger than a pencil for a maximum of two weeks.
- Year 3 and beyond: Harvest for 6 to 8 weeks, stopping when new spears become thin.
How Much Water and Fertilizer Does an Established Bed Need?
Asparagus plants love moisture but despise standing water. During the active spring harvest and the hot summer ferning period, the bed needs 1 to 2 inches (2.5 to 5 cm) of water per week. The most efficient way to deliver this is by weaving a soaker hose or drip irrigation line through the bed under the straw mulch. This keeps the foliage dry, preventing fungal diseases like asparagus rust.
Because you are cutting away the plant's growth every spring, you must replenish the soil nutrients annually. In early spring, just before the first spears break the surface, top-dress the bed with a balanced 10-10-10 granular fertilizer at a rate of 1.5 pounds (0.68 kg) per 100 square feet (9.2 square meters). Apply a second, identical dose immediately after your 8-week harvest ends to fuel the summer fern growth.
- Provide 1 to 2 inches (2.5 to 5 cm) of water weekly via drip irrigation to keep ferns dry.
- Apply a balanced 10-10-10 fertilizer in early spring before spears emerge.
- Apply a second round of fertilizer immediately after you stop harvesting for the season.
How Do You Put the Bed to Sleep in Winter?
As autumn approaches and temperatures drop, the tall green ferns will begin to turn yellow and eventually die back. Wait until after a hard frost when the ferns are completely brown and brittle. At this point, the plant has drawn all possible energy down into the crown for winter storage.
Using pruning shears, cut the dead ferns down to 2 inches (5 cm) above the soil line. Remove all the debris from the bed. Do not leave the dead ferns in place, and do not compost them if you noticed any small, metallic-blue asparagus beetles during the summer. These pests overwinter inside the hollow stems of the dead ferns. In colder regions (USDA Zones 3 to 5), cover the trimmed bed with 4 inches (10 cm) of chopped leaves or straw to insulate the dormant crowns from repeated freeze-thaw cycles that can heave them out of the soil.
- Wait until a hard frost turns the ferns entirely brown and brittle before pruning.
- Cut the dead stalks to 2 inches (5 cm) above the ground and remove the debris.
- Destroy the dead stalks to eliminate overwintering habitat for asparagus beetles.
- Insulate the bed with a thick layer of mulch in cold climates to prevent frost heaving.
| Variety Name | Sex | Best Climate | Yield Profile |
|---|---|---|---|
| Jersey Knight | All-Male | Zones 3-8 | High yield, produces very large, thick green spears. |
| Mary Washington | Male/Female | Zones 3-8 | Classic heirloom, variable yield, prone to dropping seeds. |
| Purple Passion | Male/Female | Zones 3-8 | Produces thick purple spears with a sweeter, nuttier flavor. |
| UC 157 | Male/Female | Zones 8-10 | Heat tolerant, bred for warm climates, produces early yields. |
Frequently asked questions
How many asparagus crowns do you need per person?
A good rule of thumb is 10 bare-root crowns per asparagus-eating adult. Once fully established in year three, 10 healthy crowns will yield about 5 pounds (2.2 kg) of fresh spears over the 8-week spring harvest period.
Can you plant asparagus in a raised bed?
Yes, provided the raised bed is deep enough. Because asparagus roots grow downward significantly, your raised bed must offer at least 18 inches (45 cm) of loose, well-draining soil depth. Do not plant asparagus in shallow 6-inch (15 cm) planter boxes.
Why are my asparagus spears coming up as thin as thread?
Spindly spears usually indicate a lack of root energy. This is caused by planting the crowns too shallow, heavy weed competition stealing nutrients, or over-harvesting the spears the previous spring, which prevented the ferns from recharging the roots.
Can you grow white asparagus from green varieties?
Yes. White asparagus is simply green asparagus that has been deprived of sunlight. You can achieve this by heavily mounding soil over the emerging spears or by placing an opaque, light-blocking tunnel over the row so the spears cannot photosynthesize and produce chlorophyll.
Keep reading
- Starting Your First Vegetable Garden Without Wasting a SeasonMost first gardens fail for reasons that have nothing to do with a green thumb. Here are the five that matter.
- Building Soil That Actually Grows ThingsFeeding plants is a short-term fix. Feeding the soil is what makes a garden easy.
- Reviving a Tired Lawn: A Season-Long PlanA thin lawn is a symptom. Treating the symptom with more seed is why it keeps coming back.