How Do You Install a Preformed Pond Liner So It Never Heaves or Settles?
By Jim Vernon · 8 min read · Last updated
Nothing ruins a backyard oasis faster than waking up after a heavy rainstorm to find your new garden pond floating out of the ground like a plastic boat in a sea of mud.
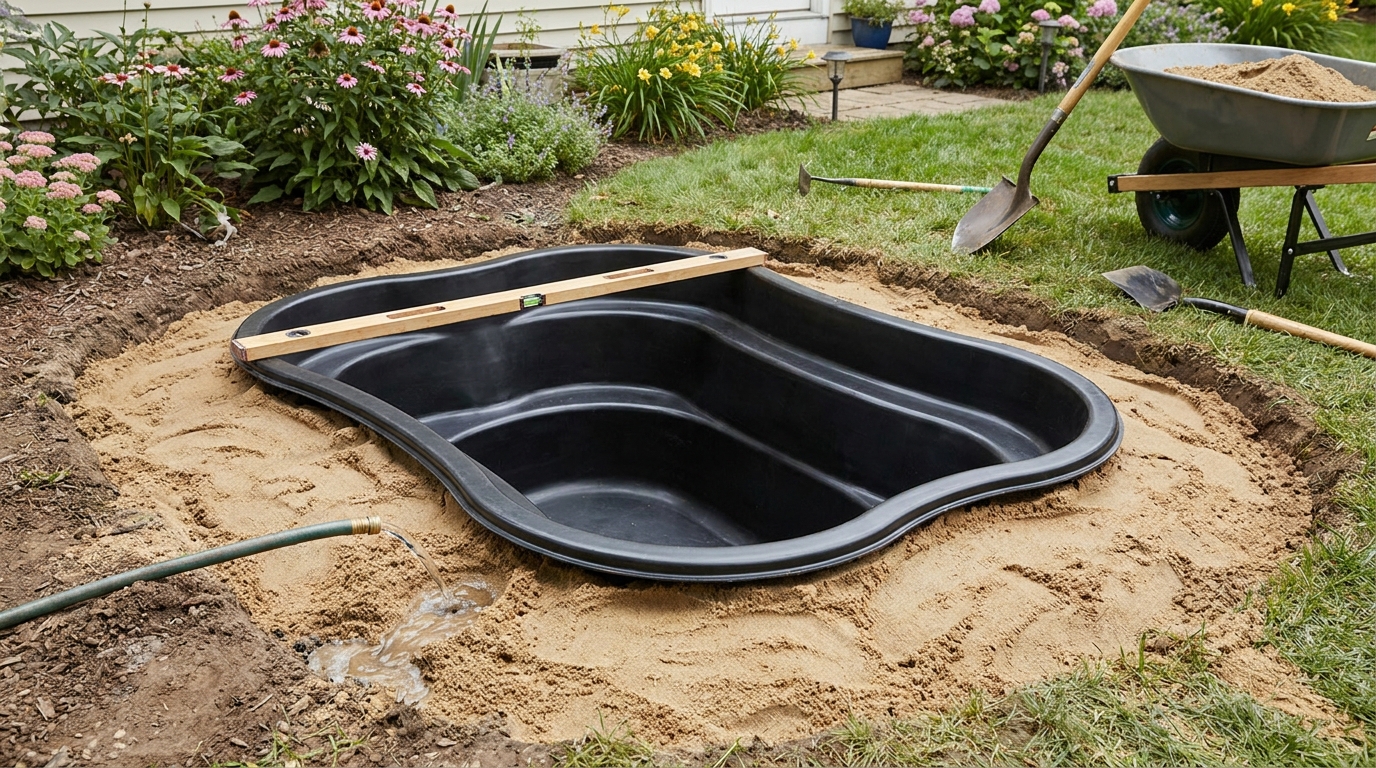
To keep a preformed pond liner permanently locked into the soil without heaving or settling, you must dig the hole exactly 2 inches (5 cm) wider and deeper than the plastic shell, bed the bottom on compacted sand, and simultaneously backfill the sides with wet sand while filling the pond with water. Skipping any of these steps allows hydrostatic pressure from groundwater to push the poorly seated tub right out of the earth. Whether you are installing a 50-gallon (189-liter) patio pond or a 250-gallon (946-liter) water feature, relying on the surrounding dirt to hold it in place will fail. Securing the base with washed sand and equalizing the water pressure is the only way to guarantee a level, long-lasting installation that survives heavy rains and winter freezes.
- Dig the excavation 2 inches (5 cm) larger on all sides and shelves to accommodate a settling bed of play sand.
- Prevent the empty shell from bowing or crushing by filling the inside with water at the exact same time you backfill the outside with sand.
- Use a straight 2x4 board spanning the entire pond to check for level, rather than trusting the warped lip of the plastic.
- Cantilever heavy flagstone over the plastic edge to protect the high-density polyethylene (HDPE) from UV degradation and cracking.
- Install a French drain near the base if you hit dense clay soil to prevent the excavation from turning into an underground bathtub.
Why do preformed garden ponds pop out of the ground?
Ground heaving happens when hydrostatic pressure builds up underneath an empty or poorly backfilled plastic tub. When heavy rain saturates the surrounding soil, the water table rises. Because a high-density polyethylene (HDPE) pond liner displaces a large volume of water, it acts just like the hull of a ship. If groundwater seeps into the air gaps between your excavated dirt and the plastic shell, that upward pressure will easily lift a partially empty pond completely out of the grass.
In colder climates like USDA Zones 5 and below, frost heave poses a second threat. When waterlogged soil freezes, it expands. If your pond is jammed tightly into a dirt hole with no drainage buffer, the expanding frozen earth will squeeze the plastic sides, forcing the tub upward and permanently knocking it out of level. A 2-inch (5 cm) buffer of washed sand around the entire shell acts as a shock absorber, allowing soil to expand and water to drain without dislodging the pond.
What tools, materials, and budget do you need for a permanent installation?
You cannot use the dirt you dig out of the ground to backfill a rigid pond. Clumpy topsoil and clay leave massive air pockets against the plastic, which eventually collapse and cause the pond to sink unevenly. Instead, you need washed play sand or masonry sand that flows smoothly into tight gaps.
For a standard 100-gallon (378-liter) preformed liner, expect to pay between $150 and $280 in 2026. You will need 10 to 15 bags (50 pounds or 22 kg each) of sand, which will add roughly $60 to $120 to your budget. To dig and level the hole properly, you need a pointed trenching shovel, a flat transfer shovel, a 4-foot (1.2-meter) builder's level, a perfectly straight 2x4 board that is at least a foot (30 cm) longer than the pond's widest point, and a garden hose with a spray nozzle.
How do you accurately trace and dig a multi-tiered pond hole?
Digging a hole for a pond with multiple plant shelves requires a step-by-step plunging method, rather than trying to carve a bowl all at once. Start by placing the pond right-side up exactly where you want it. Drive wooden stakes around the perimeter, then remove the pond and use inverted marking paint to spray a line 2 inches (5 cm) outside your stakes.
Dig this entire outer footprint down to the depth of the pond's first shallow shelf, adding 2 inches (5 cm) for the sand base. Next, place the pond into this shallow excavation. Press down hard so the deeper molded section leaves an impression in the dirt. Pull the pond out, spray a new line 2 inches (5 cm) outside that impression, and dig the deep zone down to its final depth, again adding 2 inches for sand. Tamp the raw dirt firm with a hand tamper or your boots so it does not settle later.
How do you perfectly level a rigid pond liner in the ground?
If a pond is out of level by even half an inch (1.2 cm), the water line will conspicuously expose the black plastic rim on the high side. This is where you see a distinct difference in how pros and beginners handle the job. A beginner will drop the tub into the hole, place a small torpedo level directly on the plastic rim, and adjust the dirt. The problem is that preformed liners warp during shipping and extreme temperature changes; the lip is rarely perfectly flat.
A professional ignores the rim itself. Instead, they pour 2 inches (5 cm) of wet sand into the bottom of the hole and tamp it flat. They set the pond in place, then lay a perfectly straight 2x4 board across the entire width of the pond. They place a 4-foot (1.2-meter) level on top of the board and check the level across the center, the front, and the back. Then they rotate the board 90 degrees and check the other axis, adjusting the sand underneath the base until the tub is perfectly horizontal in an X pattern.
How do you backfill the pond so the plastic walls do not collapse?
You can easily ruin the shape of your pond if you pack dirt or sand tightly around the outside of an empty shell. The weight of the backfill will cave the flexible plastic sides inward, permanently bowing the walls and reducing the water capacity. You must equalize the pressure by adding water and sand simultaneously.
Put a garden hose inside the pond and fill it with 4 inches (10 cm) of water. Stop the water. Now, pour 4 inches of dry sand into the 2-inch (5 cm) gap between the dirt wall and the plastic shell. Take your hose and gently spray the sand you just poured. The water will wash the sand heavily downward, liquefying it so it flows underneath the plant shelves and completely fills every void. Once the sand settles and feels solid, add another 4 inches of water to the inside, followed by another 4 inches of washed sand on the outside. Repeat this tier-by-tier process until you reach the rim.
How do you hide the plastic rim and prevent it from failing?
The most common failure mode for preformed ponds is cracking along the top lip. High-density polyethylene degrades when exposed to direct sunlight. If you leave the black rim visible, ultraviolet rays will break down the plasticizers. Within three to five years, the rim will turn gray, become brittle, and crack the moment someone steps on it or a heavy freeze hits.
To avoid this completely, you must shade the plastic by cantilevering rocks over the edge. Dig a shallow, 6-inch (15 cm) wide trench around the perimeter of the pond, exactly level with the plastic lip. Fill this trench with coarse leveling sand or a dry mortar mix. Set large, flat flagstones on this bed so they extend 1 to 2 inches (2.5 to 5 cm) horizontally past the pond's edge and hover just above the water line. This hides the manufactured look of the tub, shields the plastic from UV rays, and anchors the lip firmly down against ground heaving.
What should you do if your yard has heavy clay soil or a high water table?
Heavy clay soil does not drain. If you dig a large hole in clay and fill it with a pond and sand, you have effectively created an underground bathtub. During a heavy rainstorm, water will fill the sand buffer surrounding your pond, creating intense hydrostatic pressure that will try to float the tub.
If you hit dense, sticky clay while digging, you must provide an escape route for trapped water. At the lowest point of your excavation, dig a narrow trench leading downhill away from the pond. Lay a section of perforated 3-inch (7.6 cm) corrugated drain pipe in the trench, wrap it in landscape fabric, and cover it with gravel. This acts as an underground weeping drain, directing excess groundwater away from the pond's base before it can build enough upward pressure to lift the shell.
| Feature | Preformed HDPE Tub | Flexible EPDM Liner |
|---|---|---|
| Lifespan | 10 to 15 years (vulnerable to UV rays if exposed) | 20 to 25 years (highly UV resistant) |
| Installation Difficulty | Harder to level and backfill perfectly without warping | Easier to mold to custom hole shapes and ground contours |
| Puncture Resistance | Extremely high (rigid 1/4-inch molded plastic) | Moderate (can be pierced by sharp roots or rocks) |
| Cost for a 100-Gallon Setup | $150 to $280 in 2026 | $80 to $130 in 2026 (plus the cost of underlayment) |
Frequently asked questions
Do preformed pond liners need to be emptied during the winter?
It depends on your climate and the pond's depth. In USDA Zones 5 and below, ponds shallower than 18 inches (45 cm) will often freeze solid, which can crack the rigid plastic. In these regions, you should drain the pond, clean it, and leave it empty or heavily insulated during winter. In warmer zones, keep it filled and run a small floating de-icer to prevent surface freezing.
Can I use pea gravel instead of sand to backfill a preformed pond?
No. Pea gravel does not flow smoothly into the complex gaps underneath the molded plant shelves. It tends to bridge across air pockets, leaving the shelves unsupported. When you add heavy rocks or potted plants to the shelves later, the unsupported plastic will bow and potentially snap. Washed sand is required because it can be liquefied with a hose to pack tightly into every crevice.
Why does my preformed pond look crooked even though the rim is level?
If the rim is level but the water line looks slanted, the pond was likely stored improperly before you bought it, causing the shell to warp out of square. Always inspect the tub before purchasing. Sight down the top edge to ensure it is perfectly flat. If yours is already installed and slightly warped, use overhanging flagstone to hide the uneven water line and create a perfectly horizontal visual edge.
Keep reading
- Starting Your First Vegetable Garden Without Wasting a SeasonMost first gardens fail for reasons that have nothing to do with a green thumb. Here are the five that matter.
- Building Soil That Actually Grows ThingsFeeding plants is a short-term fix. Feeding the soil is what makes a garden easy.
- Reviving a Tired Lawn: A Season-Long PlanA thin lawn is a symptom. Treating the symptom with more seed is why it keeps coming back.