How Do You Install a Drip Irrigation System for Raised Beds Using a Spigot?
By Jim Vernon · 10 min read · Last updated
Imagine spending your summer evenings actually enjoying your garden with a cold drink, rather than dragging a heavy, kinking hose around the yard.
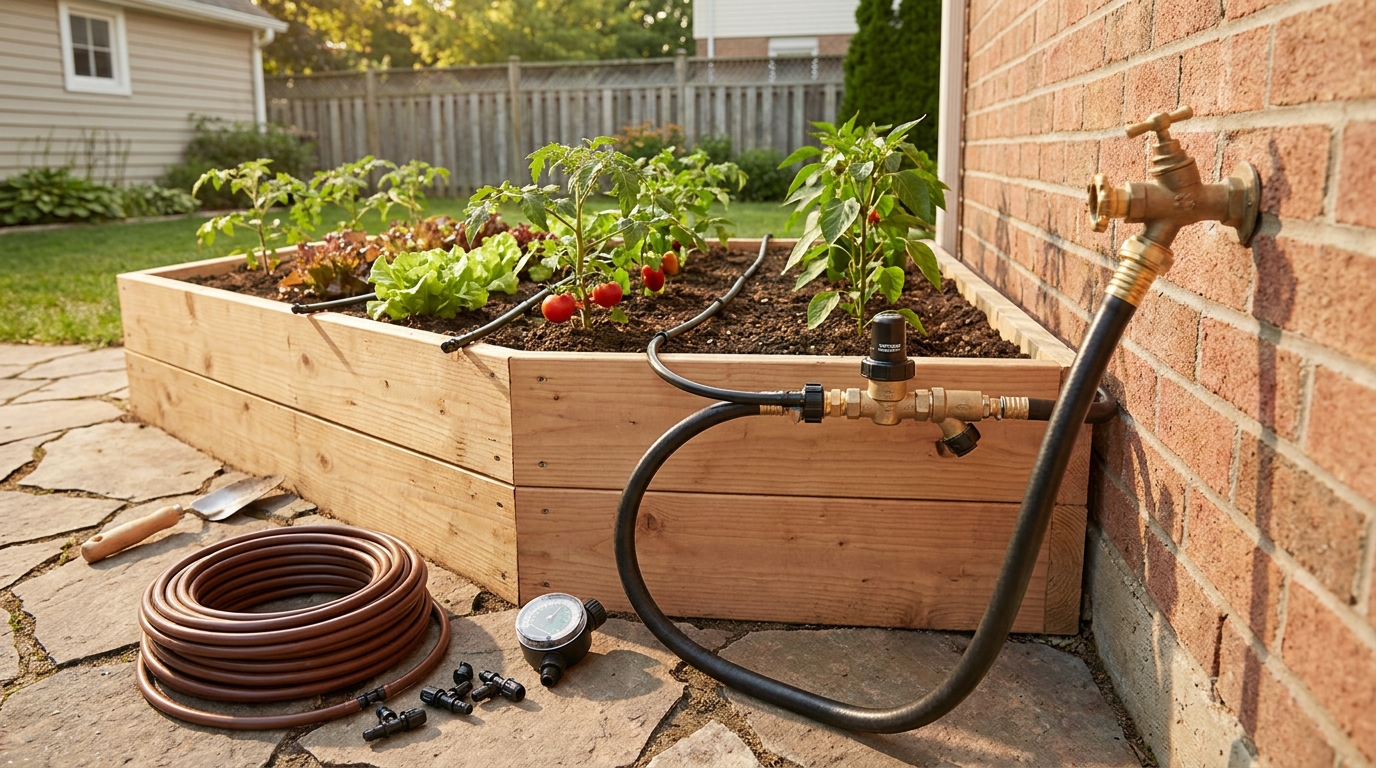
To install a drip irrigation system from an outdoor spigot, you must first attach a backflow preventer, a 150-mesh screen filter, and a 25 PSI (1.7 bar) pressure regulator directly to the faucet. From there, run a 1/2-inch (1.27 cm) solid polyethylene mainline tubing to your raised beds, then branch off with 1/4-inch (0.64 cm) emitter tubing spaced specifically for your plants' root zones. This setup delivers water at a slow, steady rate of 0.5 to 2 gallons per hour (GPH) (1.9 to 7.6 LPH), entirely eliminating surface evaporation and preventing foliar diseases caused by overhead watering. In 2026, expect to spend between $60 and $120 for a high-quality starter kit capable of covering three standard 4x8-foot (1.2x2.4 m) raised garden beds, taking roughly one afternoon to assemble and test.
- Always install spigot components in this exact order: timer, backflow preventer, filter, pressure regulator, and tubing adapter.
- Warm the ends of your tubing in hot water before inserting barbed fittings to ensure a permanent, leak-free connection.
- Never exceed 200 feet (60 m) of 1/2-inch (1.27 cm) mainline tubing or 200 GPH (757 LPH) of total water flow on a single zone.
- Use grid-spaced 1/4-inch (0.64 cm) inline drip tubing for dense plantings and individual button emitters for spaced-out plants like tomatoes.
- Flush the system fully with the end caps off every spring to prevent microscopic grit from permanently clogging the emitters.
In What Exact Order Do You Assemble the Spigot Components?
The most critical part of a drip irrigation system happens right at the water source. If you assemble the spigot components in the wrong order, the system will leak, the timer will fail, or city water pressure will blow the tubing apart. Start by attaching a heavy-duty brass Y-splitter to your spigot so you keep access to a standard garden hose. On one side of the splitter, attach a battery-operated hose timer.
Below the timer, screw on a backflow preventer (also called a vacuum breaker). This prevents stagnant, dirt-filled garden water from siphoning backward into your home’s drinking water supply if the city pressure drops. Next, attach a 150-mesh screen filter to catch debris, followed by a 25 PSI (1.7 bar) pressure regulator. Standard household water pressure sits between 50 and 80 PSI (3.4 and 5.5 bar), which will instantly blow drip fittings apart if left unregulated. Finally, screw on the 1/2-inch (1.27 cm) tubing adapter to transition from threaded pipe to poly tubing.
- Y-Splitter: Preserves manual hose access.
- Timer: Automates watering schedules.
- Backflow Preventer: Keeps garden water out of your drinking supply.
- 150-Mesh Filter: Stops grit from reaching the tubing.
- 25 PSI (1.7 bar) Regulator: Reduces municipal pressure to safe levels.
- Tubing Adapter: Connects the hardware to the 1/2-inch (1.27 cm) poly mainline.
How Do You Route the 1/2-Inch Mainline Without Tripping Hazards?
Once your spigot assembly is complete, you must route the 1/2-inch (1.27 cm) solid polyethylene mainline tubing to your raised beds. Poly tubing expands in the hot sun and contracts in the cold, so never pull it perfectly taut across the yard. Leave about 10 percent slack in the line to accommodate temperature swings. To avoid creating an ugly tripping hazard, dig a shallow 2-inch (5 cm) trench through your grass or mulch and bury the mainline until it reaches the base of the first raised bed.
When you reach the bed, use a 90-degree barbed elbow fitting to run the tubing vertically up the outside corner of the wood. Secure it to the side of the bed using 1/2-inch (1.27 cm) galvanized pipe straps, being careful not to pinch or crush the plastic tubing. Run the mainline along the inside perimeter of the bed, capping the very end of the line with a figure-eight hose end closure so you can easily open it later.
- Leave 10 percent slack in the tubing to allow for thermal expansion.
- Bury the mainline in a 2-inch (5 cm) trench across pathways.
- Use 90-degree elbows to run tubing neatly up the corners of raised beds.
- Secure tubing to the wood with galvanized straps, avoiding over-tightening.
What Is the Pro Secret to Connecting Barbed Fittings Without Leaks?
Connecting rigid plastic fittings to stiff polyethylene tubing is notoriously frustrating. A judgement call a pro makes differently from a beginner happens right at the connection phase. Beginners will try to force cold 1/2-inch (1.27 cm) tubing onto plastic barbed tees and elbows using sheer hand strength. This almost always results in tubing that is only pushed halfway over the barb, which eventually blows off under pressure.
Pros avoid this struggle by bringing a thermos of hot water—roughly 140°F (60°C)—out to the garden. By dipping the end of the poly tubing into the hot water for exactly five seconds, the plastic softens beautifully. You can then slide the tubing entirely over the barbed fitting with one hand. As the plastic cools, it shrink-wraps itself around the barb, creating a watertight, blowout-proof seal without the need for messy hose clamps.
- Fill a thermos with 140°F (60°C) water before starting.
- Dip the tubing end for five seconds to soften the plastic.
- Push the tubing completely over all ridges of the barbed fitting.
- Allow the plastic to cool and shrink-wrap for a permanent seal.
Should You Choose Inline Emitter Tubing or Individual Button Emitters?
Once the 1/2-inch (1.27 cm) mainline is circling your raised bed, you must deliver water to the soil. You have two primary choices: 1/4-inch (0.64 cm) inline emitter tubing or individual button emitters. For dense plantings like carrots, lettuce, and onions, use a grid of inline emitter tubing. This tubing has microscopic holes pre-drilled every 6 inches (15 cm). Run parallel lines of this tubing 6 inches (15 cm) apart across the entire bed. This creates a uniform wetting pattern that moistens every square inch of soil.
For spaced-out, heavy-feeding plants like tomatoes, peppers, and squash, individual button emitters are far superior. Run a solid, un-perforated piece of 1/4-inch (0.64 cm) tubing directly from the mainline to the base of the plant. Attach a single 1 GPH or 2 GPH (3.8 LPH or 7.6 LPH) button emitter and stake it exactly at the root zone. This spot-watering method prevents wasting water on empty soil and actively discourages weed seed germination between your vegetable rows.
- Inline tubing creates a total moisture grid for dense root vegetables.
- Button emitters provide targeted spot-watering for spaced fruiting plants.
- Use 1/2 GPH (1.9 LPH) emitters for heavy clay soils that absorb water slowly.
- Use 2 GPH (7.6 LPH) emitters for fast-draining, sandy loam raised beds.
How Do You Calculate Flow so the Last Bed Actually Gets Water?
If you build a massive garden layout without doing basic math, the plants nearest the spigot will drown while the plants at the far end of the line remain bone dry. To ensure consistent pressure, you must follow the 200/200 rule for 1/2-inch (1.27 cm) mainline tubing. Never run more than 200 linear feet (60 m) of 1/2-inch tubing on a single zone, and never exceed a total output of 200 Gallons Per Hour (GPH) (757 LPH).
To calculate your total, simply add up your emitters. If you have a bed with fifty 1 GPH (3.8 LPH) button emitters, that bed consumes 50 GPH (189 LPH). You can safely link up to four of these beds on one zone before you hit the 200 GPH limit. If your garden exceeds this capacity, you must split the layout into two separate zones using a dual-outlet hose timer, running each zone at different times of the day.
- Follow the 200/200 rule: maximum 200 feet (60 m) of tubing and 200 GPH (757 LPH) flow.
- Count the GPH rating of every individual emitter to find your total.
- Use a dual-zone timer to split larger gardens into separate watering schedules.
- Never tee off the 1/4-inch (0.64 cm) micro-tubing; always pull from the 1/2-inch (1.27 cm) mainline.
How Do You Prevent the Emitters From Permanently Clogging?
The most devastating common failure mode for any drip system is microscopic grit clogging the internal labyrinths of the drip emitters. Because the holes are as small as a needle, even the tiniest speck of sand or algae will block the flow entirely. Once a 1/4-inch (0.64 cm) inline emitter is clogged, it cannot be cleaned; that section of tubing must be cut out and thrown away.
To avoid this, you must aggressively manage water quality. First, never omit the 150-mesh screen filter at the spigot assembly, and unscrew the filter housing to rinse the screen once a month during the growing season. Second, you must perform a system flush twice a year. Open the figure-eight end caps on all your 1/2-inch (1.27 cm) mainlines and turn the water on full blast for two minutes. This blows out accumulated earwigs, algae, and calcium flakes before they can get shoved into the tiny micro-emitters.
- Install and maintain a 150-mesh screen filter at the water source.
- Rinse the filter screen under a strong tap once a month.
- Flush the entire system with the end caps removed at the start and end of every season.
- Never bury emitters under the soil; lay them on the surface beneath a loose layer of mulch.
How Long and How Often Should You Run the Drip System?
Drip irrigation operates at a drastically different pace than a traditional hose or sprinkler. Because the water is applied slowly, it relies on capillary action to spread outward and downward into the soil. Running a drip system for 10 minutes a day is a massive mistake; it only moistens the top half-inch of soil, causing plants to grow weak, shallow roots that bake in the afternoon sun.
Instead, you must water deeply and infrequently. Set your timer to run for 45 to 60 minutes per session. In mild climates or during the spring, running the system two times a week is generally sufficient. In hotter climates like USDA Zones 9 and 10, raised beds dry out incredibly fast and may require 45-minute sessions four times a week during peak summer. After your first test run, dig down with a hand trowel. The soil should be consistently moist—not muddy—to a depth of 6 to 8 inches (15 to 20 cm).
- Avoid short, daily watering schedules that promote shallow root growth.
- Run the system for 45 to 60 minutes per session to ensure deep saturation.
- Adjust frequency based on weather, aiming for 2 to 4 times a week.
- Physically check soil moisture at an 8-inch (20 cm) depth to verify your run times.
| Emitter Type | Best Application | Flow Rate | Pros & Cons |
|---|---|---|---|
| 1/4-Inch Inline Tubing | Dense rows (carrots, salad greens, radishes) | 0.5 GPH (1.9 LPH) per hole, spaced every 6 inches (15 cm) | Pro: Creates uniform soil moisture. Con: Inflexible if you change plant spacing. |
| Button Emitters | Spaced plants (tomatoes, peppers, squash) | 1 to 2 GPH (3.8 to 7.6 LPH) per emitter | Pro: Delivers water exactly to the root zone. Con: Requires more manual assembly. |
| Micro-Sprinklers | Ground cover or freshly seeded beds | 10 to 15 GPH (37.8 to 56.7 LPH) | Pro: Wets large surface areas quickly. Con: Sprays water on foliage, encouraging fungal disease. |
Frequently asked questions
Can I run drip irrigation from a rain barrel instead of a spigot?
Yes, but standard gravity-fed rain barrels only produce about 1 to 2 PSI (0.06 to 0.13 bar) of pressure. Standard pressure-compensating drip emitters require at least 15 PSI (1 bar) to open. If using a rain barrel, you must buy specialized zero-pressure emitters or install a small inline water pump.
Do I need to take the system apart during freezing winters?
You do not need to bring the tubing indoors, but you must winterize the spigot components. Remove the timer, backflow preventer, filter, and regulator and store them inside so the internal plastic components don't freeze and crack. Remove the end caps from the garden tubing to let water drain out.
Why is my timer running but no water is reaching the garden?
This usually happens when the backflow preventer or pressure regulator is installed backwards, entirely blocking the flow of water. Look for directional flow arrows printed on the sides of the plastic housings and ensure they point toward the garden. Another culprit is a heavily clogged filter screen.
Can I bury the 1/4-inch drip tubing under the soil?
Never bury drip emitters directly in the dirt. Dirt will back-siphon into the emitter holes when the system turns off, clogging them permanently. You can, however, lay the tubing on top of the soil and cover it lightly with 2 inches (5 cm) of bark mulch or straw to prevent sun degradation.
Keep reading
- Starting Your First Vegetable Garden Without Wasting a SeasonMost first gardens fail for reasons that have nothing to do with a green thumb. Here are the five that matter.
- Building Soil That Actually Grows ThingsFeeding plants is a short-term fix. Feeding the soil is what makes a garden easy.
- Reviving a Tired Lawn: A Season-Long PlanA thin lawn is a symptom. Treating the symptom with more seed is why it keeps coming back.