How Do You Install a Backyard Shade Sail That Survives High Winds?
By Jim Vernon · 7 min read · Last updated
A shade sail turns a baking patio into an outdoor living room, but only if you anchor it tightly enough to survive the first summer thunderstorm.
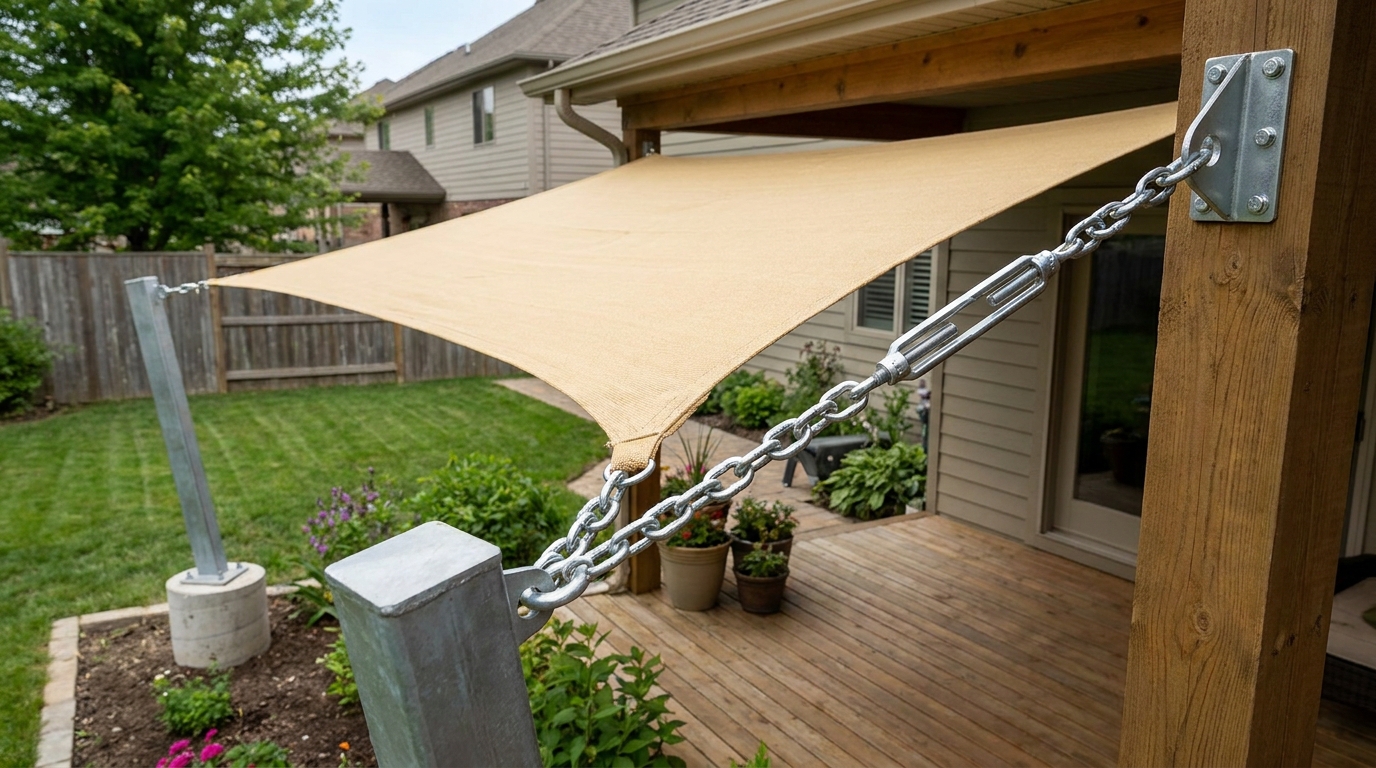
To install a backyard shade sail that survives high winds, you must anchor the corners to structural wood framing or heavy posts set deeply in concrete, using stainless steel turnbuckles to apply at least 100 pounds (45 kg) of tension per corner. Never attach a shade sail to house siding, standard fence posts, or roof gutters. The wind load of a 15-by-15-foot (4.5-by-4.5-meter) fabric square can easily exceed 1,000 pounds of force during a gust, instantly snapping weak supports and ripping down eaves. A successful installation requires locating solid mounting points, setting independent posts below the frost line, and winching the fabric so tightly that it cuts through the wind instead of acting like a parachute.
- Anchor house mounts directly into wall studs, heavy headers, or structural blocking, never into siding or trim boards.
- Set standalone wood or steel posts at least 3 to 4 feet (90 to 120 cm) deep in concrete, pitched 5 degrees away from the sail.
- Use heavy-duty 316 stainless steel turnbuckles and a mechanical ratchet strap to eliminate center sagging and pull the edges drum-tight.
- Build a 20-to-30 percent height differential between corners to shed rainwater and prevent destructive fabric stretching.
Why Do So Many DIY Shade Sails Sag and Rip in the Wind?
The primary failure mode of a DIY shade sail is a lack of tension. A large piece of fabric acts exactly like a ship's sail, catching massive amounts of upward and lateral wind force. If the sail is left loose, the wind violently snaps the fabric back and forth, a destructive process called shock loading.
This repeated snapping fatigues the mounting hardware until a lag screw pulls out of the wood or a steel corner ring deforms. A properly installed shade sail should be drum-tight. When you slap the center of the fabric, it should bounce back instantly without any visible slack. The tighter the sail, the better it deflects wind gusts instead of catching them like a net.
Where Should You Anchor a Shade Sail on Your House?
A common and disastrous mistake is mounting a shade sail pad eye directly to a 1-by-6-inch (2.5-by-15-cm) fascia board. The wind will effortlessly rip the trim board right off your rafter tails. To attach a sail safely to your house, you must drive 3/8-inch (9.5 mm) stainless steel lag screws deeply into solid framing.
This means you have to locate a wall stud, a heavy door header, or install structural 2-by-6-inch (5-by-15-cm) blocking between your roof trusses specifically to hold the anchor hardware. Siding, brick veneer, and trim are decorative surfaces, not structural anchors.
- Locate structural studs or door headers using a deep-scan stud finder.
- Pre-drill pilot holes to prevent the heavy lag screws from splitting the wood framing.
- Fill the pilot hole with exterior-grade silicone sealant before driving the lag screw to prevent water intrusion behind the siding.
How Deep Do Shade Sail Posts Need to Be Buried?
If you are placing independent posts in the yard, standard 4-by-4-inch wooden fence posts will bow and eventually snap under the constant tension of a large sail. You need 6-by-6-inch (15-by-15-cm) pressure-treated wood posts or 4-by-4-inch (10-by-10-cm) heavy-gauge steel columns.
A fundamental engineering rule for shade sails is that one-third of the post's total length must be buried in the ground. For an 8-foot (2.4-meter) finished height, you need a 12-foot (3.6-meter) post with 4 feet (1.2 meters) below grade. Dig a 12-to-18-inch (30-to-45-cm) diameter hole, dropping the post well below your local frost line. Pitch the post away from the center of the sail by about 5 degrees before pouring the concrete. This slight backward lean counteracts the massive inward pull of the tensioned fabric.
Why Must a Shade Sail Be Installed on a Slope?
Even porous shade sails can trap water during a heavy downpour if installed perfectly flat. This creates a bathtub effect, where pooling water permanently stretches the high-density polyethylene (HDPE) fabric or adds so much dead weight that the mounting posts collapse.
To shed water and wind simultaneously, you must build a 20-to-30 percent height differential into your design, creating a shape known as a hyperbolic paraboloid, or a 'hypar' twist. If your two house anchors are mounted at 10 feet (3 meters) high, your two yard posts should attach the sail at 7 or 8 feet (2.1 or 2.4 meters) high. Alternatively, alternate high and low attachment points at each corner to create a dramatic twist that sheds water instantly and slices through wind aerodynamically.
What Hardware Do You Actually Need to Hang the Sail?
Skip the cheap, lightweight hardware kits sold alongside budget shade sails. Their galvanized metal will rust, and their weak threads will strip under real tension. You need marine-grade 316 stainless steel hardware rated for heavy structural loads.
The hardware should be 5/16-inch (8 mm) thick at minimum for sails under 15 feet (4.5 meters), stepping up to 3/8-inch (9.5 mm) for larger custom designs. If the sail's corner ring does not reach your anchor point, bridge the gap with stainless steel wire rope, never a nylon rope, which will stretch over time and ruin your hard-earned tension.
- Pad eyes: The heavy diamond or square anchor plate that bolts directly to your house or posts.
- D-shackles: The secure loop that connects the sail's corner ring to the anchor or turnbuckle.
- Turnbuckles: The adjustable, threaded center link that creates the final high-tension pull on the fabric.
How Do You Tension a Shade Sail Properly?
This is the critical judgement call where pros operate completely differently from beginners. A beginner will connect three corners, attach a turnbuckle fully extended to the fourth corner, and try to pull the sail tight by hand while slipping the metal pin into place. You will never achieve the necessary 100-plus pounds (45 kg) of tension using your arms alone.
A pro uses a $15 ratcheting tie-down strap to mechanically winch the corner tight. Hook one end of the ratchet strap to the house anchor and the other to the sail's corner ring. Crank the ratchet until the sail is completely flat and rigid. Once the fabric is under immense tension, you can easily connect your turnbuckle, tighten it a few spins, and release the ratchet strap. Finish by wrenching the turnbuckle until the sail is incredibly taut.
How Much Does a High-Wind Shade Sail Installation Cost in 2026?
In 2026, a resilient DIY shade sail installation costs between $350 and $700, depending heavily on the scale of the sail and your soil conditions. The bulk of the expense lies in the structural supports rather than the fabric itself.
Hiring a professional landscaping or awning crew to perform this same installation correctly—with deep concrete footings and structural blocking—typically costs between $1,200 and $2,500. Doing it yourself saves money, but only if you invest those savings into the right posts and heavy-duty hardware.
- High-quality 190 GSM shade sail: $80 to $150
- Marine-grade 316 stainless steel hardware kit: $60 to $100
- Two 12-foot 6x6 treated wood posts: $80 to $100
- 10 to 12 bags of 80-pound concrete: $60 to $80
- Gas post-hole auger rental (recommended): $80 to $100 per day
| Sail Size | Wood Post Size | Hole Depth | Concrete per Post |
|---|---|---|---|
| Up to 10x10 ft (3x3 m) | 4x4 inch (10x10 cm) | 36 inches (90 cm) | 3 bags (240 lbs) |
| 12x12 to 16x16 ft (3.6x3.6 to 4.8x4.8 m) | 6x6 inch (15x15 cm) | 48 inches (120 cm) | 4 to 5 bags (320-400 lbs) |
| Over 16x16 ft (4.8x4.8 m) | 8x8 inch (20x20 cm) or 4x4 steel | 60 inches (150 cm) | 6 to 8 bags (480-640 lbs) |
Frequently asked questions
Can you attach a shade sail to a standard wooden fence?
No. Standard wooden fence posts are typically set only 24 inches (60 cm) deep and are engineered to hold vertical weight, not the massive lateral pulling force of a shade sail. The wind load will easily warp the fence line or snap the posts off right at the ground level.
Do shade sails block rain completely?
Standard high-density polyethylene (HDPE) shade sails block about 90 percent of UV rays but allow wind and heavy rain to pass through the weave. Fully waterproof shade sails exist, but they require massive, heavily engineered structural anchors because they catch 100 percent of the wind and water that hits them.
Should I take my shade sail down in the winter?
Yes. If you live in a climate that receives snow, you must remove the sail before the first freeze. Even an inch of snow accumulation will add thousands of pounds of dead weight to the fabric, instantly stretching it out of shape and potentially collapsing your mounting posts.
How long do shade sail fabrics actually last?
A high-quality, commercial-grade HDPE shade sail (190 GSM or higher) will last 5 to 10 years if it is kept properly tensioned. Cheap nylon sails from big-box stores typically degrade, stretch, and tear within a single summer under harsh UV exposure and continuous wind flapping.
Keep reading
- Starting Your First Vegetable Garden Without Wasting a SeasonMost first gardens fail for reasons that have nothing to do with a green thumb. Here are the five that matter.
- Building Soil That Actually Grows ThingsFeeding plants is a short-term fix. Feeding the soil is what makes a garden easy.
- Reviving a Tired Lawn: A Season-Long PlanA thin lawn is a symptom. Treating the symptom with more seed is why it keeps coming back.