How Do You Build a Paver Patio Base That Won't Sink?
By Jim Vernon · 7 min read · Last updated
A wavy, sunken patio is a heartbreak written in stone, but a few extra inches of properly compacted gravel will keep your pavers dead flat for decades.
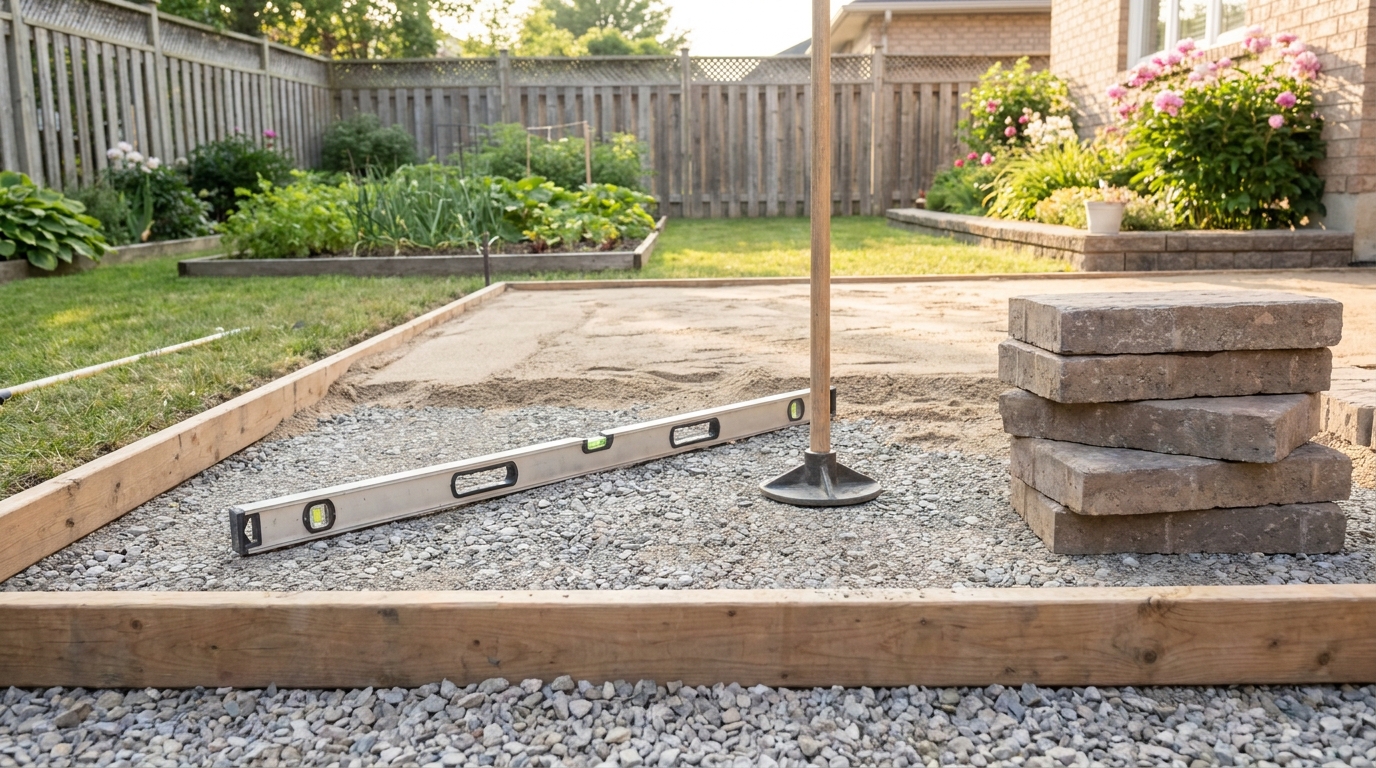
To build a paver patio that will not sink, you must excavate 7 to 9 inches (17.8 to 22.9 cm) of soil and build a two-part foundation consisting of a compacted 4- to 6-inch (10.2 to 15.2 cm) sub-base of 3/4-inch minus crushed stone, topped with exactly 1 inch (2.5 cm) of uncompacted coarse concrete sand. You cannot use round pea gravel, soil, or stone dust as your primary base because these materials shift under pressure and trap water. A standard 10-by-12-foot (3-by-3.6-meter) patio requires about 3 cubic yards of base rock, costing between $120 and $250 in 2026, plus a $75 daily plate compactor rental. Proper compaction happens in 2-inch (5 cm) lifts, walking the machine in a grid pattern until the rock is hard enough to bounce a hammer.
- Dig at least 7 inches (17.8 cm) deep to allow for 4 inches (10.2 cm) of gravel, 1 inch (2.5 cm) of sand, and the thickness of the pavers.
- Use 3/4-inch minus crushed stone (Class 5 or road base) for the sub-base, never smooth or round gravel.
- Compact the gravel sub-base in 2-inch (5 cm) layers with a 3,000-pound centrifugal force plate compactor.
- Slope the entire base 1/4 inch per foot (2 cm per meter) away from any house foundation to guarantee drainage.
How deep do you actually need to dig for a paver patio?
The depth of your excavation dictates the lifespan of your patio. To calculate your total digging depth, add the thickness of your compacted gravel sub-base, your sand bedding layer, and the pavers themselves. For a standard backyard patio holding only foot traffic and patio furniture, you need 4 inches (10.2 cm) of compacted gravel. Driveways or areas parking heavy equipment require 8 to 12 inches (20.3 to 30.5 cm).
Add to that gravel depth exactly 1 inch (2.5 cm) for the sand bedding layer, and roughly 2.37 inches (6 cm) for a standard concrete paver. This means a standard pedestrian patio requires a total excavation depth of about 7.5 inches (19 cm). If you live in USDA Hardiness Zones 1 through 5, where deep frost heaves are common, digging down an extra 2 inches (5 cm) for a thicker gravel base provides cheap insurance against winter ground swelling.
- Standard pedestrian patio base: 4 inches (10.2 cm) of gravel.
- Driveway or hot tub pad base: 8 to 12 inches (20.3 to 30.5 cm) of gravel.
- Sand bedding layer: Always exactly 1 inch (2.5 cm).
What is the right type of gravel for a patio base?
The only material you should use for a paver sub-base is 3/4-inch minus crushed stone. Depending on your region, quarries and stone yards might call this road base, Item 4, Class 5, or modified crushed stone. The word minus is the critical part of the name. It means the mix contains 3/4-inch jagged rocks all the way down to coarse stone dust.
When you compact this specific mixture, the sharp edges of the larger rocks lock together, while the dust fills every microscopic void between them. Once mechanically compacted and lightly misted with water, 3/4-inch minus turns into a semi-solid mass that mimics concrete but remains flexible enough to survive freeze-thaw cycles. Never use rounded stones like pea gravel or river rock. Round stones act like ball bearings under pressure; no matter how much you tamp them, they will roll, shift, and eventually sink your patio.
How do you properly compact the gravel sub-base?
Compaction is where most DIY patio projects fail. You cannot achieve a lasting base by stomping on the gravel or using a hand tamper for anything larger than a garbage can pad. You must rent a gas-powered vibratory plate compactor. In 2026, a standard 3,000-pound centrifugal force plate compactor costs about $75 to $95 per day to rent at most big-box hardware stores.
The golden rule of compaction is to work in layers, called lifts. Spread your 3/4-inch minus gravel no thicker than 2 inches (5 cm) at a time. Mist the gravel lightly with a garden hose to activate the stone dust binder, then run the plate compactor over the entire area in a grid pattern. Walk the machine north to south, then east to west. Add the next 2-inch (5 cm) lift and repeat the process until you reach your final 4-inch (10.2 cm) base height. The surface should be hard enough that a swung hammer bounces off it.
Why do you need a sand layer, and what kind is best?
The sand layer serves a singular purpose: it creates a perfectly smooth, level bed for the pavers to sit on. You do not compact the sand before laying the pavers. Instead, you lay the pavers on the fluffy, uncompacted sand, and the final tamping of the finished patio sets the blocks into the sand, locking them in place. The sand layer must be exactly 1 inch (2.5 cm) thick.
Use coarse concrete sand, often sold as C33 sand. It has large, jagged particles that allow water to drain through quickly. Do not use masonry sand, play sand, or stone dust. These materials have ultra-fine particles that hold moisture like a sponge, which traps water under your pavers and leads to frost heaving in the winter. To get a perfect 1-inch (2.5 cm) depth, lay 1-inch outer diameter steel pipes across your compacted gravel and use a straight piece of 2x4 lumber to pull the sand flat across the tops of the pipes.
How do you slope a patio for proper drainage?
Water pooling against a house foundation causes basement flooding and structural damage, so every patio must slope away from the home. The industry standard slope for a paver patio is 1/4 inch of drop for every 1 foot of run (about a 2 percent grade, or 2 cm drop per meter). If your patio extends 12 feet (3.6 meters) out from your house, the far edge must be exactly 3 inches (7.6 cm) lower than the edge resting against the house.
The biggest mistake beginners make is digging a perfectly flat hole and trying to create the slope using only the sand layer. Sand washes out if it is unevenly applied. The slope must begin at the dirt level. Your excavated soil floor, your compacted gravel sub-base, and your sand bedding layer must all follow that exact same 1/4-inch per foot (2 cm per meter) pitch.
How do pros handle the patio edges differently than beginners?
A patio is only as strong as its perimeter. If the outer row of pavers shifts outward, the interlocking tension of the entire patio releases, causing the inner pavers to sag and separate. This is a crucial judgement call where professionals operate differently than amateurs. A beginner will often install plastic edge restraints by nailing them into the dirt or placing them on top of the sand layer.
A professional always over-excavates the patio footprint by at least 6 to 8 inches (15.2 to 20.3 cm) on all sides. This extra width means the compacted gravel sub-base extends past the final paver edge. The pro then installs rigid plastic or aluminum edge restraints directly onto that extended compacted gravel base, nailing them down with 10-inch (25.4 cm) steel spikes driven every 12 inches (30.5 cm). Because they are anchored into hard gravel rather than loose sand or soft dirt, the edges never blow out.
What are the biggest mistakes that cause patios to sink?
The most common failure mode for DIY patios is skimping on excavation depth because digging by hand is exhausting. It is tempting to dig out just the sod and dump 2 inches (5 cm) of gravel into a shallow hole. However, if you build a patio over topsoil or uncompacted clay, the natural freeze-thaw cycles and heavy rain will turn that underlying soil to mud, swallowing the thin gravel layer and warping your patio within two seasons. Always dig down to undisturbed subsoil.
Another guaranteed way to ruin a patio base is neglecting to install a geotextile fabric. If you pour gravel directly over raw soil, ground moisture and heavy foot traffic will eventually force the mud up into the clean gravel, compromising its strength. Laying a heavy-duty, woven geotextile fabric across the dirt before dumping your first lift of gravel keeps the soil and stone permanently separated, doubling the lifespan of your flat surface.
| Material | Purpose | Permeability | 2026 Cost per Ton |
|---|---|---|---|
| 3/4-Inch Minus Crushed Stone | Sub-base structure and load bearing | Moderate (binds tightly but drains) | Between $40 and $65 |
| Coarse Concrete Sand | Bedding layer for leveling pavers | High (drains water rapidly) | Between $35 and $50 |
| Polymeric Sand | Joint filler to lock pavers and block weeds | Low (hardens to shed water) | Between $600 and $800 |
| Pea Gravel | Decorative only (Do Not Use for Base) | Very High (shifts constantly) | Between $45 and $70 |
Frequently asked questions
Do I need landscape fabric under my patio base?
Yes, placing a woven geotextile fabric between the raw soil and the gravel base prevents the soil from migrating up into the stone, which weakens the foundation over time.
Can I use stone dust instead of concrete sand for the bedding layer?
No. Stone dust holds moisture and can cause the pavers to heave during winter freezes. It also does not allow for proper drainage compared to coarse concrete sand.
How much does it cost to build a DIY paver base in 2026?
For a standard 10-by-12-foot (3-by-3.6-meter) patio, expect to spend between $300 and $450 on the crushed stone, concrete sand, geotextile fabric, edge restraints, and plate compactor rental, excluding the cost of the actual pavers.
Can I compact the base with a hand tamper?
You can, but you should not for anything larger than a small stepping-stone landing. A 10-inch (25.4 cm) hand tamper cannot achieve the density required for a lasting patio; you will inevitably experience settling over time. Rent a gas-powered machine.
Keep reading
- Starting Your First Vegetable Garden Without Wasting a SeasonMost first gardens fail for reasons that have nothing to do with a green thumb. Here are the five that matter.
- Building Soil That Actually Grows ThingsFeeding plants is a short-term fix. Feeding the soil is what makes a garden easy.
- Reviving a Tired Lawn: A Season-Long PlanA thin lawn is a symptom. Treating the symptom with more seed is why it keeps coming back.