How Do You Secure a Sagging Plaster Ceiling Without Tearing It Down?
By Jim Vernon · 8 min read · Last updated
A sagging plaster ceiling isn't just an eyesore; it's a hundred pounds of crushed limestone waiting to crash onto your dining table.
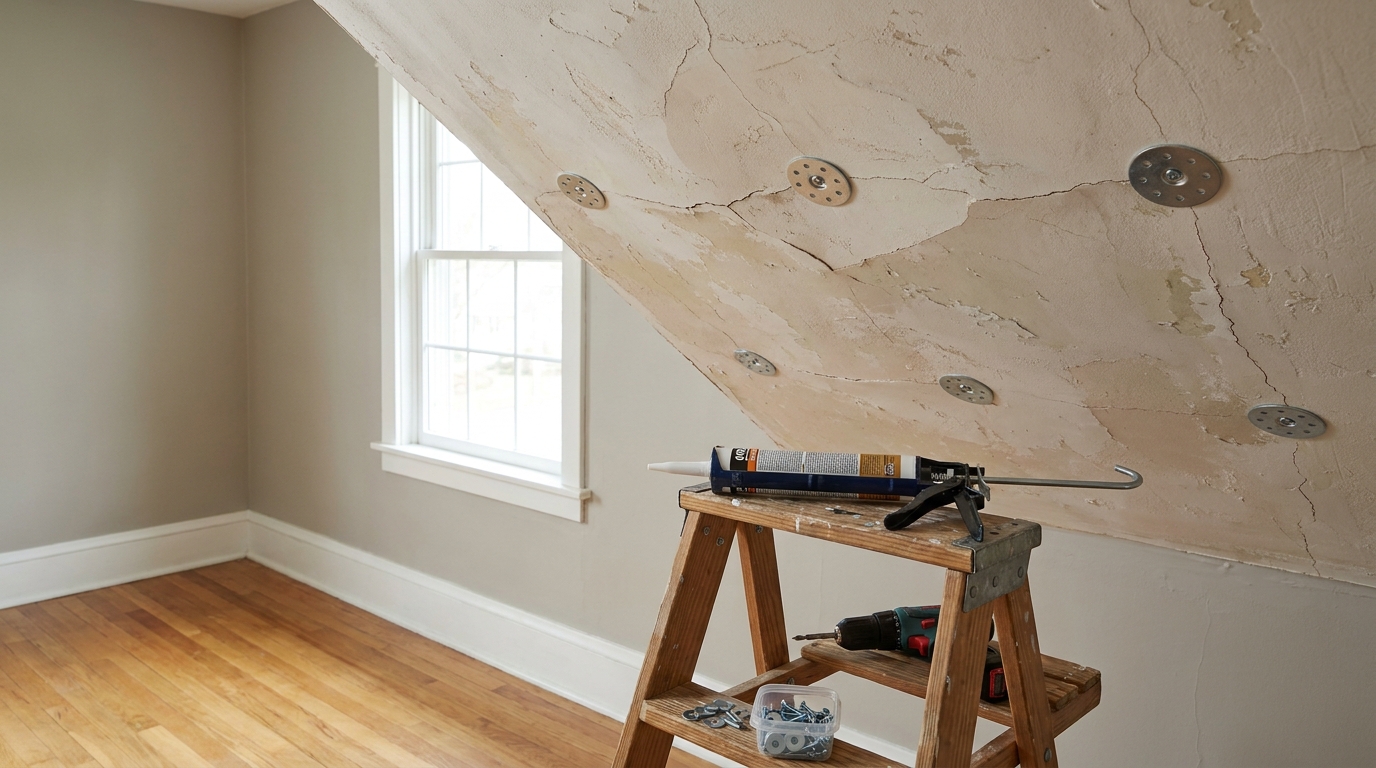
To fix a sagging plaster ceiling without demolishing it, you must reattach the broken plaster keys to the wood lath behind it using specialized steel plaster washers, coarse-thread screws, and an injected acrylic adhesive. You will drill injection holes every 3 to 4 inches (7.5 to 10 cm) around the sagging area, spray a liquid conditioner into the holes, pump in the heavy adhesive, and immediately clamp the ceiling tight by driving screws and washers into the lath. After waiting 24 to 48 hours for the adhesive to cure, you can remove the screws and skim-coat the surface with setting-type joint compound. Expect to spend $60 to $85 in 2026 for a DIY repair kit covering a 4-by-4-foot (1.2-by-1.2-meter) area, saving you upwards of $800 over hiring a professional to tear it out and install new drywall. This method creates a permanent chemical bond that preserves the historic fabric of your home without the staggering mess of a full plaster tear-out.
- Use a masonry drill bit, not a wood twist bit, to drill holes so you do not rattle the wood lath and cause more cracks.
- Never inject adhesive without first spraying an acrylic conditioner, or the old plaster dust will absorb the moisture and ruin the bond.
- Set your drill clutch to the lowest setting to prevent driving screws too deeply and cratering the brittle ceiling.
- Leave the clamping washers in place for at least 24 hours at temperatures above 60°F (15°C) to ensure a permanent cure.
- Use a setting-type joint compound rather than pre-mixed mud to conceal the repair, as it shrinks less and adheres better to old plaster.
Why Do Plaster Ceilings Sag in the First Place?
Historic ceilings built before the 1950s consist of narrow wood strips called lath, nailed horizontally across the structural ceiling joists. Plasterers pushed wet plaster through the 1/4-inch (6 mm) to 3/8-inch (10 mm) gaps between these strips. As the plaster dried and expanded, it formed mushroom-shaped globs on the backside called keys that locked the heavy ceiling in place.
Over decades, vibrations from heavy foot traffic above, minor foundation settling, or slight water leaks snap these fragile keys. Once the keys break, gravity takes over, and the plaster separates from the lath, creating a visible, menacing sag. If you can push up gently on the ceiling with your palm and feel it move, the keys are broken but the plaster can be saved. However, if the plaster is powdery, heavily water-stained, or feels like a damp sponge, the internal binder has failed entirely and the material must be completely removed.
How Do You Find the Wood Lath Behind the Plaster?
To secure the ceiling safely, your screws must bite into the wood lath, not just spin uselessly in the empty gaps between them. Wood lath typically runs perpendicular to your floor joists, spaced closely together. Because lath is secured to the joists with small iron nails, you can use a strong rare-earth magnet to locate the joist lines across the ceiling.
Mark these joist lines with painter's tape. You now know the lath runs horizontally across these taped lines. When drilling your injection holes, you will probe gently through the plaster. If the drill bit hits wood immediately after passing through the typical 3/4-inch (19 mm) plaster layer, you have found lath. If the bit punches through into empty space, you hit a gap and need to adjust your target half an inch (1.2 cm) up or down.
What Materials Do You Actually Need for the Repair?
Forget standard drywall screws; they will tear right through old plaster without gripping anything. You need steel plaster washers, which are slightly convex, 1-inch (2.5 cm) perforated discs designed to distribute the clamping force over a wide area without breaking the surface. Pair these with 1 5/8-inch (4 cm) coarse-thread drywall screws.
For the chemical bond, you need a specialized two-part plaster repair kit. This includes a watery acrylic conditioner to prime the old plaster, and a thick, glue-like acrylic adhesive injected via a standard caulking gun. In 2026, expect to spend $60 to $85 for a kit that covers roughly 16 square feet (1.5 square meters) of ceiling space. You will also need a 3/16-inch (5 mm) masonry drill bit, a spray bottle for the conditioner, and a shop vacuum.
How Do You Drill and Inject the Adhesive Properly?
Drill a ring of holes spaced 3 to 4 inches (7.5 to 10 cm) apart around the perimeter of the sag, working your way inward toward the center. This is where a professional makes a completely different judgement call than a beginner. A beginner will often grab a standard wood twist drill bit, which violently catches on the wood lath, aggressively shaking the lath strip and snapping even more plaster keys in the surrounding area. A professional always uses a masonry bit, which grinds smoothly through the plaster and stops cleanly without grabbing the wood behind it.
After drilling, vacuum every single hole to remove the loose dust. Next, spray the liquid acrylic conditioner into each hole until the cavity is saturated. If you skip this conditioning step, the decades-old plaster dust will instantly suck all the moisture out of the heavy adhesive, causing it to dry out, crumble, and fail entirely. Wait 15 minutes for the conditioner to soak in, then pump a dime-sized dollop of the thick adhesive into each hole.
How Do You Clamp the Ceiling Without Cracking It Worse?
Immediately after injecting the adhesive, you must clamp the heavy plaster back against the wood lath. Place a plaster washer onto your coarse-thread screw and drive it directly into the injection hole. If the injection hole landed in a gap between the lath, drive the screw about half an inch (1.2 cm) away so the threads bite firmly into solid wood.
The most common failure mode during this project is overtightening the screw. If you drive it too hard with an impact driver, the convex steel washer will invert, crush the brittle plaster, and punch a crater straight into your ceiling, leaving you with zero holding power and a much bigger patching job. To avoid this entirely, use a standard drill and set the clutch to its lowest numerical setting. Stop driving the exact moment the washer flattens out and sits flush against the ceiling. The plaster should pull up tightly against the lath.
How Long Do You Leave the Washers In?
The acrylic adhesive needs time to cure and form a permanent, flexible bond between the back of the old plaster and the wood lath. Leave the clamping washers securely in place for at least 24 to 48 hours. The ambient room temperature must remain above 60°F (15°C) during this entire curing window for the adhesive to cross-link properly.
Once the adhesive is fully cured, you have a choice to make. You can back the screws out, remove the steel washers, and rely completely on the new chemical bond to hold the ceiling up on its own. Alternatively, if the plaster was heavily fractured into dozens of small pieces, you can leave the screws and washers in place permanently to provide ongoing mechanical support under the paint.
How Do You Skim Coat and Finish the Repaired Area?
If you removed the washers, you will be left with a grid of small injection holes. If you left them in, you will have a bumpy surface of steel discs. Either way, you need to conceal the repair so the ceiling looks flat again. Use a setting-type joint compound like Durabond 90 or Easy Sand 45 rather than standard pre-mixed bucket mud. Setting-type compound dries chemically, shrinks significantly less, and dries rock-hard, making it highly compatible with historical plaster.
Trowel a tight, smooth skim coat over the holes or the washers. If there are visible cracks running completely through the sag, cover them with self-adhesive fiberglass mesh tape before skimming over them. Once the compound is dry, sand it lightly with 120-grit paper, prime the patches with a high-build latex primer, and apply two coats of flat ceiling paint to hide any remaining surface imperfections.
| Repair Method | 2026 DIY Cost Range | Time to Complete | Durability |
|---|---|---|---|
| Plaster Washers + Adhesive Kit | $60 - $85 per 16 sq. ft. | 2 Days (including cure time) | Permanent chemical and mechanical bond |
| Drywall Overlay (1/4-inch) | $150 - $250 for average room | 3 to 4 Days | High, but covers historic trim and lowers ceiling |
| Screws Only (No Adhesive) | $15 - $25 for screws/washers | 4 Hours | Low; plaster will eventually crack around the washers |
Frequently asked questions
Can I use construction adhesive like Liquid Nails to reattach plaster?
No. Standard construction adhesive is far too thick to inject properly through a small hole and will not bond correctly to the dusty backside of old plaster. You must use an acrylic plaster adhesive specifically formulated to flow over the lath and bond with the mandatory help of a liquid primer conditioner.
What if the plaster feels spongy or damp to the touch?
If the plaster is soft, crumbling, or damp, the chemical structure of the original lime and gypsum has failed, usually due to an active roof leak or plumbing issue. Adhesive cannot bond to rotted plaster. You must fix the water source, tear out the damaged section entirely, and patch it with new drywall.
Do I need to find the ceiling joists to install plaster washers?
No, you only need to anchor your screws into the thin wood lath strips that run perpendicular to the joists. The lath itself is structurally sound enough to support the weight of the plaster once the adhesive cures and permanently bonds the two surfaces together.
Can I paint right over the plaster washers if I leave them in?
You can, but they will be highly visible. To properly hide them, you must apply at least two thin coats of a setting-type joint compound over the washers, feathering the edges out by 6 to 8 inches (15 to 20 cm) so the ceiling appears perfectly flat, then sand and prime before painting.
Keep reading
- How Much Paint Do You Actually Need for a Room?The tin says 400 square feet. Your wall says otherwise. Here is the arithmetic that actually holds up.
- DIY or Hire a Pro? A Decision Framework That Is Not About MoneyThe labour saving is real. So is the cost of a job done twice — and of tools you use once.
- Storage for Small Rooms That Does Not Make Them SmallerSmall rooms do not need more storage. They need storage that stops interrupting the eye.