How Do You Safely Remove a Glued-On Bathroom Mirror Without Shattering It?
By Jim Vernon · 6 min read · Last updated
You can ditch that frameless builder-grade mirror in under an hour without sending a shower of glass shards into your sink.
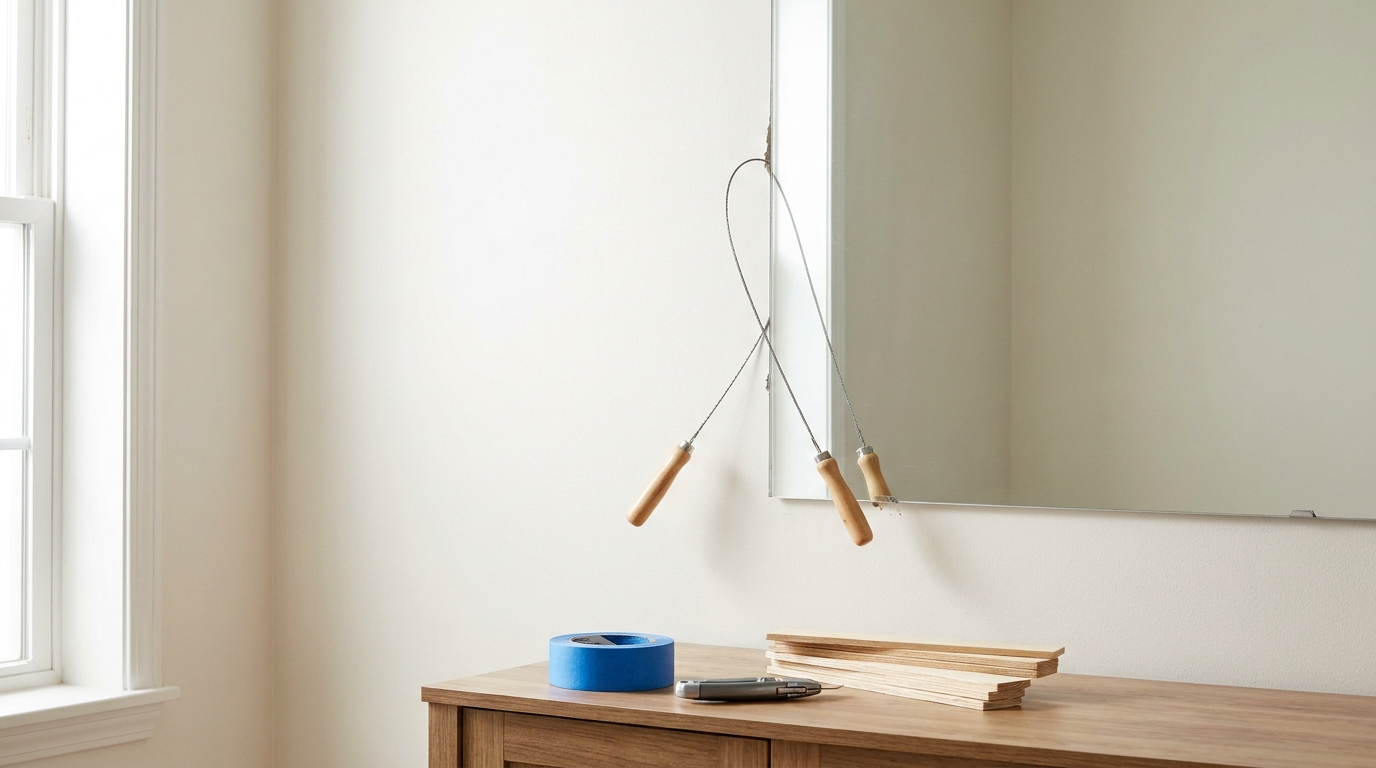
The safest way to remove a glued-on bathroom mirror is to physically slice through the adhesive globs behind the glass using a braided steel windshield cut-out wire. Prying the glass away from the wall will inevitably result in shattered glass and severely torn drywall paper. By using a back-and-forth sawing motion with a wire to detach the mastic, you keep the heavy glass intact and preserve the structural integrity of the wall surface beneath it.
- Slice the mirror mastic behind the glass using a braided steel wire instead of prying the mirror off the wall.
- Cover the entire face of the mirror in a grid of heavy-duty packing tape to contain glass shards if a crack occurs.
- Insert wooden shims behind the glass as you cut to prevent the freshly sliced adhesive from re-attaching to the wall.
- Seal torn drywall paper with a shellac-based primer before applying joint compound to prevent the repair from bubbling.
What Tools Will You Need and What Will They Cost in 2026?
Removing a large sheet of glass requires specialized but inexpensive tools to handle the sheer weight and the strength of the construction adhesive. A standard 36-by-60-inch (91-by-152-centimeter) piece of 1/4-inch (6-millimeter) mirror glass weighs roughly 45 pounds (20 kilograms). You cannot handle this safely with your bare hands and a screwdriver.
In 2026, you can expect to spend between $35 and $60 total for the necessary supplies if you do not already own them. You will need a braided steel windshield removal wire kit ($15 to $25), two heavy-duty suction cup lifters ($10 to $20), a pack of wooden cedar shims ($3), and heavy-duty clear packing tape ($5). For personal protective equipment, leather work gloves and ANSI-rated wrap-around safety glasses are absolutely mandatory.
- Braided windshield cut-out wire or a low-E acoustic guitar string.
- Two heavy-duty glass suction cups rated for at least 50 pounds (23 kilograms) each.
- A heat gun to soften older, hardened mirror mastic.
- Leather work gloves and wrap-around safety glasses.
Why Do Amateurs Fail When Removing Wall Mirrors?
The most common failure mode when removing a mirror is attempting to pry it off the wall using a crowbar or flathead screwdriver. Glass does not flex. The moment you wedge a rigid metal tool behind the corner and apply outward leverage, the tension focuses on a single point, causing the entire sheet to snap violently.
Even if the glass miraculously survives the prying, the mirror mastic binding it to the wall will not yield. Instead, the force will rip massive chunks of drywall paper and gypsum core right off the studs, turning a simple mirror swap into a major drywall patching job. You can avoid both the danger of flying glass and the headache of torn drywall by entirely abandoning the idea of prying. The mirror must be separated from the wall by cutting the glue, not by pulling the glass.
How Do You Properly Tape the Mirror for Shatter Protection?
Before any cutting begins, you must tape the entire face of the mirror. If the glass does crack during the removal process, a dense web of tape will hold the sharp pieces together in one continuous sheet, acting like laminated safety glass and preventing a dangerous mess.
Run strips of heavy-duty packing tape or dedicated glass-masking film across the entire surface. Start with horizontal strips spaced about 4 inches (10 centimeters) apart, then add vertical strips to create a grid pattern. Finally, run two long strips diagonally from corner to corner. Press the tape down firmly so it bonds tightly to the glass surface.
How Do Professionals Detach the Glue Behind the Glass?
A major judgment call separates professionals from beginners on this task: beginners try to dissolve the glue, while pros physically cut it. A DIYer will often try to spray chemical solvents like adhesive remover or alcohol behind the mirror. This is a waste of time because solvents evaporate long before they can seep down to the thick globs of mastic sitting 20 inches (50 centimeters) deep behind the glass. Professionals rely entirely on mechanical cutting.
To cut the glue, wrap the ends of a 36-inch (91-centimeter) length of braided windshield wire around two wooden dowels or handles. Slide the wire behind the top corner of the mirror. With one person holding each handle, pull the wire back and forth in a smooth, continuous sawing motion while applying downward pressure. As you slice through each glob of black mastic, insert a wooden shim into the gap at the top. This prevents the heavy glass from leaning back and allowing the freshly cut glue to re-bond.
How Do You Lift the Loose Mirror Safely?
Once the wire passes the bottom edge of the mirror, the glass is completely detached. If you do not support the bottom edge, it will slide straight down and crash onto the vanity countertop or floor. Keep the bottom edge resting on the backsplash, or screw a temporary wooden ledger board into the wall directly beneath the mirror before you start cutting.
Attach your two heavy-duty suction cups to the face of the taped mirror, positioning them roughly at chest height and spaced evenly apart. Lock the suction levers. With two people, grip the suction cup handles, tilt the top of the mirror slightly toward you, and lift it straight up and away from the wall. Carry it immediately out of the house or to a safe disposal area.
How Do You Repair the Drywall After the Mirror is Gone?
Your wall will now be covered in thick, hard globs of leftover adhesive. Do not try to forcefully pull these globs off the wall, or you will pull the drywall paper off with them. Instead, use a heat gun set to about 250 degrees Fahrenheit (121 degrees Celsius) to soften the mastic for 30 seconds. Once it softens, take a sharp 6-inch (15-centimeter) putty knife and slice the glob off flush with the wall.
You will inevitably have a few areas where the brown paper facing of the drywall is exposed. You cannot apply wet joint compound directly to torn drywall paper, or the moisture will cause the paper to bubble up and ruin your finish. Seal any torn paper first with a fast-drying shellac-based primer, which costs about $22 per quart in 2026. Wait 45 minutes for the primer to dry, then apply a smooth skim coat of lightweight joint compound over the area. Once dry, sand it smooth with a 120-grit sanding sponge, prime the entire wall, and you are ready for paint.
| Tool Type | Result | Why It Works or Fails |
|---|---|---|
| Braided Steel Wire | Success | Abrasive texture easily saws through thick mastic without flexing the glass. |
| Flat Pry Bar | Failure | Creates extreme point-pressure on the glass, causing an immediate, violent shatter. |
| Chemical Solvents | Failure | Evaporates before reaching the deep adhesive globs behind the heavy glass. |
| Heat Gun (for cleanup) | Success | Softens leftover adhesive on the drywall, allowing a putty knife to slice it flush. |
Frequently asked questions
Will dental floss work to cut mirror adhesive?
No. Dental floss and standard fishing line are not abrasive or strong enough to cut through hardened construction adhesive. They will snap repeatedly. You must use braided steel wire or a thick acoustic guitar string.
How do you dispose of a large bathroom mirror?
Wrap the mirror entirely in an old blanket or heavy cardboard and tape it securely. Because mirrors are treated with reflective chemicals, they cannot go in standard glass recycling bins. You must drop it off at your local municipal solid waste facility or construction debris dump.
Should I smash the mirror and take it down in pieces?
Absolutely not. Smashing a mirror while it is glued to the wall sends dangerous glass splinters into the air and leaves razor-sharp shards permanently adhered to the drywall, making the cleanup highly hazardous and drywall repair nearly impossible.
Keep reading
- How Much Paint Do You Actually Need for a Room?The tin says 400 square feet. Your wall says otherwise. Here is the arithmetic that actually holds up.
- DIY or Hire a Pro? A Decision Framework That Is Not About MoneyThe labour saving is real. So is the cost of a job done twice — and of tools you use once.
- Storage for Small Rooms That Does Not Make Them SmallerSmall rooms do not need more storage. They need storage that stops interrupting the eye.