How Do You Replace a Damaged Asphalt Shingle Without Ripping Up the Roof?
By Jim Vernon · 9 min read · Last updated
A single torn shingle can channel gallons of rainwater straight into your attic during the next storm, but you do not need an expensive roofer to swap it out.
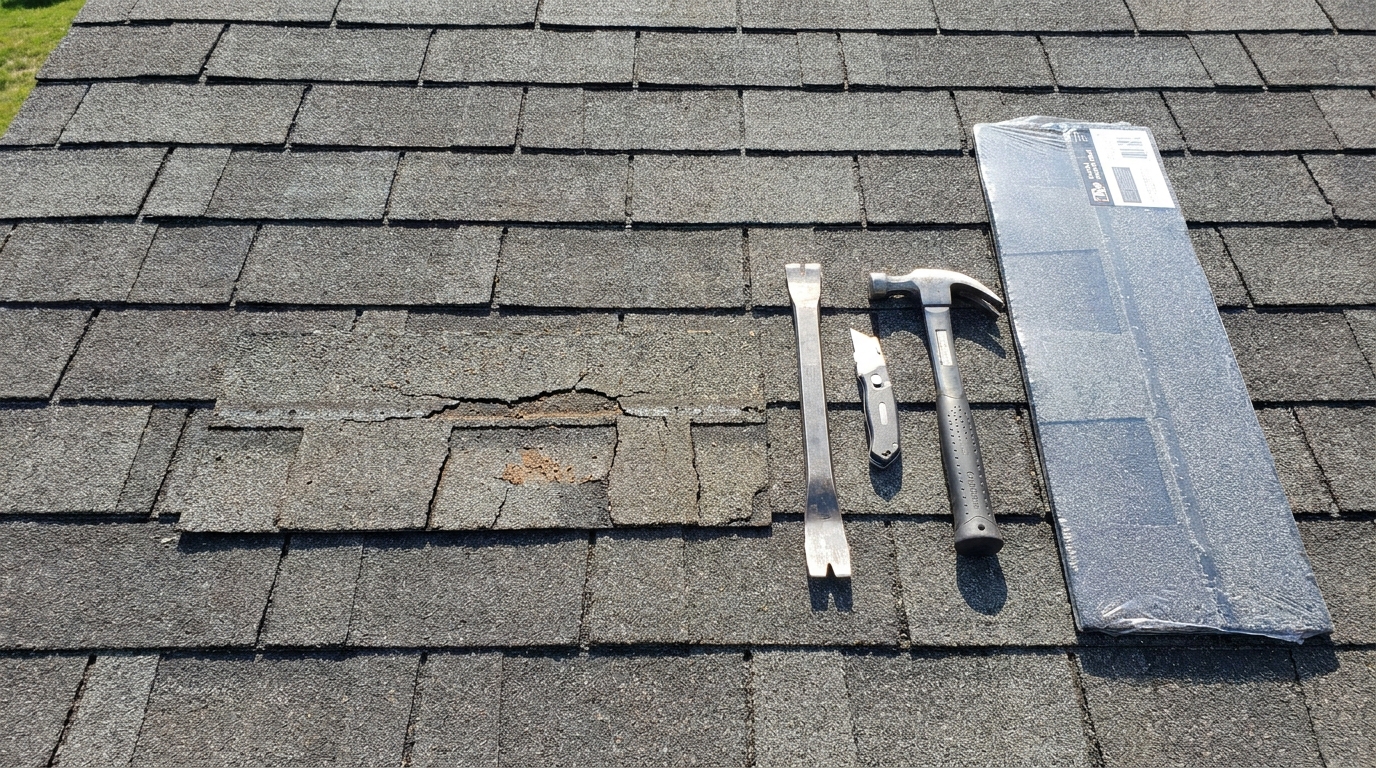
You replace a damaged asphalt shingle by carefully breaking the adhesive seal on the broken shingle and the one directly above it, removing the hidden roofing nails with a flat pry bar, sliding a matching new shingle into place, and securing it with four new galvanized roofing nails. The process is straightforward, but it requires patience to avoid causing collateral damage to your roof deck. The secret to completing this repair without tearing the surrounding shingles is working on a warm day when the asphalt is pliable, lifting the top shingles no more than 45 degrees, and resealing the tabs with roofing cement. Doing this yourself takes less than thirty minutes and costs a fraction of a contractor's minimum call-out fee.
- Work when the outdoor temperature is between 60°F and 80°F (15°C to 26°C) so the asphalt shingles bend rather than snap.
- You must remove the nails from both the damaged shingle and the row directly above it, because roofing overlaps mean each shingle is pinned twice.
- Never lift an older, brittle shingle higher than 45 degrees, or you will create a permanent crease in the fiberglass mat that leads to future leaks.
- Always manually seal the new shingle tabs to the roof using a quarter-sized dab of plastic roofing cement, as it takes time for the factory sun-seal to activate.
Why Does Shingle Temperature Matter Before You Start?
Asphalt shingles are essentially flexible sheets of fiberglass coated in asphalt and mineral granules. Their flexibility is entirely dependent on ambient temperature. If you attempt to pry up a shingle when it is near freezing, the fiberglass mat will snap, and you will turn a single-shingle replacement into a multi-row nightmare. Conversely, if you work in the dead of summer when the roof is baking at 120°F (49°C), the asphalt becomes mushy, and your boots will scuff the protective granules right off the surface.
The ideal window for this repair is when the ambient air temperature sits between 60°F and 80°F (15°C to 26°C). At this temperature, the factory tar strip holding the shingles together is solid enough to break cleanly with a pry bar, but the shingle body remains pliable enough to lift without tearing. This is a classic judgement call where professionals differ from beginners. A beginner will force a stiff shingle on a cold morning and crack the hinge point. A pro will wait for the afternoon sun to warm the roof, or if they must work in the cold, they will gently sweep a heat gun on its lowest setting across the shingle to restore flexibility before prying.
- Wait for a dry day with temperatures between 60°F and 80°F (15°C to 26°C).
- Wear soft-soled sneakers rather than heavy work boots to avoid scarring warm shingles.
- Keep your replacement shingle flat on the ground until you climb the ladder, as draped shingles will deform.
What Tools and Materials Do You Need for the Job?
You cannot perform a clean shingle replacement with just a hammer and your bare hands. The primary tool you need is a flat pry bar, often called a wonder bar. It has a wide, flat profile that slips easily beneath the fragile roofing layers without puncturing the underlying tar paper. You will also need a standard claw hammer, a utility knife fitted with a hook blade for cutting shingles without dulling the edge on the granules, and a tube of asphalt plastic roof cement.
For the fasteners, use 1 1/4-inch (3.1 cm) galvanized steel roofing nails. Standard wood nails will rust out within a year, causing brown streaks and eventual leaks. Finally, you need the replacement shingle. If you do not have spares left over from the original installation in your garage, take a broken piece to a local roofing supply yard. In 2026, a bundle of architectural shingles costs between $38 and $45, and a tube of roofing sealant runs $8 to $10. Even if you have to buy a full bundle to use just one shingle, this $50 fix beats a $300 minimum service charge from a roofing company.
- Flat pry bar with a thin, beveled edge.
- Claw hammer and 1 1/4-inch (3.1 cm) galvanized roofing nails.
- Utility knife equipped with a hook blade for clean cuts.
- A tube or small tub of asphalt plastic roofing cement.
How Do You Break the Adhesive Seal Without Tearing Neighboring Shingles?
Every modern asphalt shingle has a dashed line of heat-activated sealant on its top surface. When the sun bakes the roof, the shingle above melts slightly into this sealant, locking the roof together against wind uplift. Before you can remove any nails, you have to break this bond.
Slide the thin edge of your flat pry bar beneath the bottom edge of the damaged shingle. Wiggle the bar gently from side to side to slice through the tar strip. Do not force the bar upward, or you will gouge the roof. Once the damaged shingle is loose, you must repeat this exact process on the shingle immediately above it. Because shingles overlap, the row above physically covers the top half of the damaged shingle.
- Slide the pry bar straight in, keeping it flush with the roof pitch.
- Use a side-to-side slicing motion to cut the tar bond.
- Break the seal on the damaged shingle and the entire shingle directly above it.
- Never lift the freed shingles higher than a 45-degree angle.
Where Are the Hidden Nails Actually Located?
The most common failure mode for first-time roof repair is yanking on a damaged shingle after removing only four nails, completely ripping the top half of the shingle off and leaving the broken piece trapped under the row above. This happens because beginners do not understand the nailing overlap.
A standard 3-tab or architectural shingle is secured by two separate rows of nails. The first row consists of four nails driven through the middle of the damaged shingle itself. The second row consists of four nails driven through the middle of the shingle directly above it. Because of the overlap, those upper nails penetrate through the top edge of your damaged shingle, pinning it to the roof deck a second time. To free one shingle, you must locate and pull eight separate nails.
- Lift the damaged shingle to reveal its central row of four nails.
- Lift the shingle above to reveal its central row of four nails.
- Remember that the upper row of nails passes directly through the top edge of your damaged shingle.
- You must remove all eight nails before the damaged shingle will slide free.
How Do You Safely Extract the Old Nails?
Pulling roofing nails requires finesse because you are working in tight spaces and applying leverage against a fragile surface. Slide your flat pry bar up the slot beneath the shingle until the notch catches the shaft of the nail.
Before you push down on the pry bar to pop the nail, slide a spare piece of sheet metal or a putty knife under the heel of the pry bar. This distributes the pressure and prevents the metal heel from crushing the granules into the shingle underneath. Apply firm, steady downward pressure to lift the nail head. Once it sits proud of the shingle, you can pull it out with the claw of your hammer. After all eight nails are removed, the damaged shingle will slide straight down and out of the array.
- Catch the nail shaft in the V-notch of your flat pry bar.
- Protect the underlying shingle by resting the pry bar on a flat piece of metal.
- Use smooth pressure to pull the nail straight up, avoiding lateral bends.
- Discard the old nails immediately so they do not end up in your driveway or lawn.
How Do You Install and Nail the New Shingle?
Take your new replacement shingle and slide it up underneath the top row. You may need to wiggle it slightly to bypass the old nail holes in the tar paper. Align the bottom edge of the new shingle so it runs perfectly parallel and flush with the shingles beside it.
Lift the top shingle slightly and drive four new 1 1/4-inch (3.1 cm) galvanized nails along the designated nailing strip of the new shingle. Drive the nails flush with the surface, but do not overdrive them. A hammer strike that crushes the fiberglass mat creates a crater that will hold water and eventually leak. Next, lift the shingle above and drive four new nails into its nailing strip. Position these new upper nails about 1 inch (2.5 cm) to the left or right of the old nail holes so they bite into fresh, solid plywood rather than slipping into a stripped hole.
- Slide the new shingle up until its bottom edge aligns perfectly with its neighbors.
- Nail exactly on the designated nailing line to hit the thickest part of the shingle.
- Drive nails flush; if you sink the head deep into the shingle, pull it and start over.
- Offset your top-row nails by 1 inch (2.5 cm) from the original holes.
How Do You Seal the Repair So It Never Leaks?
While the new shingle has a factory tar line, it will not bond immediately, leaving your roof vulnerable to wind uplift during the next storm. You have to manually seal the repair.
Load a caulk gun with exterior-grade plastic roofing cement. Lift each tab of your newly installed shingle and apply a single, quarter-sized dab of cement about 2 inches (5 cm) from the bottom edge. Press the tab down firmly. Repeat this process for the shingle directly above your repair. Finally, put a tiny bead of cement over the old, exposed nail holes underneath the top shingle just to ensure no moisture wicks down into the roof deck.
- Use specialized plastic roofing cement, not silicone or window caulk.
- Apply a quarter-sized dab under each free tab.
- Press the shingle down firmly to spread the cement out thinly.
- Smear a tiny bit of cement over the empty, abandoned nail holes.
| Feature | 3-Tab Shingle | Architectural Shingle |
|---|---|---|
| Appearance | Flat, uniform block pattern | Dimensional, layered look |
| Wind Resistance | Up to 60 mph | 110 to 130 mph |
| Nailing Zone | Specific strip above the cutouts | Wider reinforced middle band |
| Average 2026 Bundle Cost | $25 to $35 | $38 to $45 |
Frequently asked questions
Can you patch a torn shingle with sealant instead of replacing it?
You can use roofing cement to glue down a torn tab as a temporary emergency fix during a storm, but it will eventually fail under UV exposure. A full replacement is the only permanent solution.
How do I match faded roof shingles on an older house?
Take a piece of the broken shingle to a local roofing supply house rather than a big-box store. Supply houses stock a wider variety of color blends and can often find a lot that closely matches your faded roof.
What happens if I accidentally overdrive a roofing nail?
Overdriving a nail punches the metal head straight through the waterproof fiberglass mat, ruining the holding power. You must pull the overdriven nail, fill the hole with roofing cement, and drive a new nail 1 inch (2.5 cm) to the side.
Do I need to replace the tar paper under the damaged shingle?
Unless the tar paper (underlayment) is visibly torn, rotted, or missing, you do not need to replace it. If you do spot a tear, spread a thin layer of roofing cement over the rip before sliding the new shingle into place.
Keep reading
- How Much Paint Do You Actually Need for a Room?The tin says 400 square feet. Your wall says otherwise. Here is the arithmetic that actually holds up.
- DIY or Hire a Pro? A Decision Framework That Is Not About MoneyThe labour saving is real. So is the cost of a job done twice — and of tools you use once.
- Storage for Small Rooms That Does Not Make Them SmallerSmall rooms do not need more storage. They need storage that stops interrupting the eye.