How Do You Install a Rain Chain That Doesn't Splash Your Foundation?
By Jim Vernon · 9 min read · Last updated
A rain chain dangling freely in a storm is essentially a wet metal whip waiting to destroy your siding.
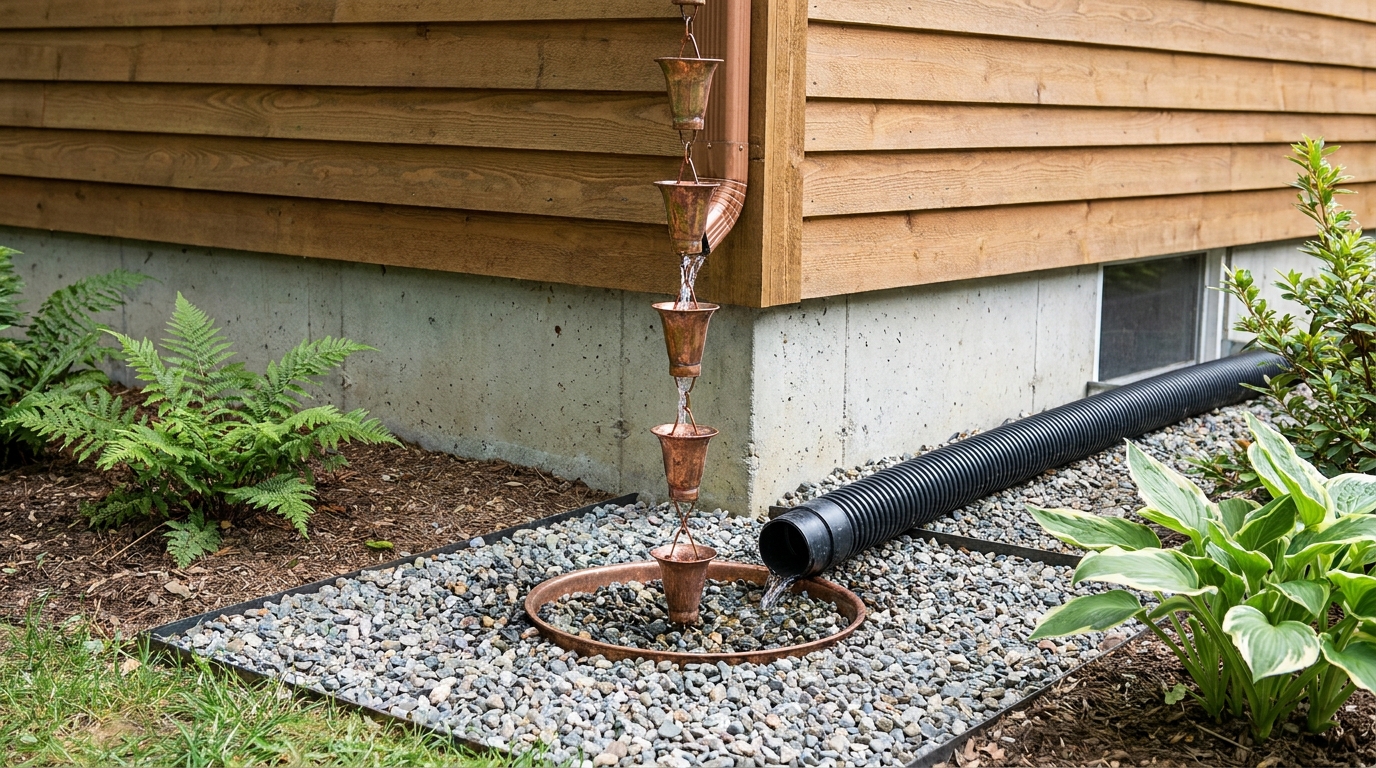
To install a rain chain that directs water safely away from your foundation without splashing, you must replace the standard gutter drop with a flanged installation kit and firmly anchor the chain's base into a dedicated drainage basin. Leaving a rain chain to dangle freely is the most common mistake made by homeowners; wind will blow the water off course and slam the metal against your siding. By securing the bottom to a gravel-filled catch basin, a sloped French drain, or a staked rain barrel screen, and using cup-style chains rather than simple open links, you can handle heavy roof runoff efficiently. A proper installation seamlessly marries the architectural appeal of exposed water flow with the rigid physics of home exterior drainage.
- Always use a flanged reducer inside the gutter hole to funnel water directly onto the chain instead of letting it creep underneath the eaves.
- Anchor the bottom of the chain to a ground stake or a heavy drainage basin grate to prevent severe wind-whip damage to your siding.
- Choose cup-style rain chains over link-style variants if you live in an area that experiences moderate to heavy downpours.
- Direct the collected water away from the foundation using an 18-inch (45.7 cm) deep gravel pit or a dedicated underground drain pipe.
Why Do Some Rain Chains Splash Water Everywhere?
The primary reason rain chains splash water aggressively against siding is the use of link-style chains in heavy-downpour climates instead of cup-style chains. Link chains rely strictly on surface tension to guide water downward. This tension breaks easily in high winds or torrential rain, sending water flying up to 3 feet (0.9 m) in every direction. Cup-style chains feature open-bottomed funnels that actively catch and redirect water back toward the center of the vertical chain, physically breaking the fall and minimizing horizontal splash.
A secondary cause of splashing is poor gutter transition. If water drops from a wide hole onto a narrow chain, much of it never connects with the metal. To stop the splashing at the source, you must ensure the flow of water is concentrated tightly as it exits the roofline.
- Link-style chains are best reserved for light drizzle climates or strictly decorative uses over open garden beds.
- Cup-style chains can handle standard residential roof runoff, typically processing over 1 inch (2.5 cm) of rain per hour.
- Wind acts as a force multiplier on splashing; unanchored chains will blow off their vertical axis and lose all surface tension.
What Tools and Materials Are Required for the Job?
You do not need to be a master metalworker to hang a rain chain, but having the right components is crucial for long-term success. As of 2026, expect to spend between $120 and $250 for a complete, high-quality residential setup. You will need an 8.5-foot (2.6 m) pure copper or powder-coated aluminum rain chain, a flanged gutter installation kit, a tube of exterior-grade polyurethane sealant, and heavy-duty tin snips if you need to modify your aluminum gutter. Copper is generally the preferred material because it develops a natural, weather-resistant patina over time, whereas cheaper steel chains will inevitably rust and stain your hardscaping.
For the drainage groundwork, pick up a shovel, a roll of non-woven landscape fabric, and about three 50-pound (22.6 kg) bags of washed 3/4-inch (19 mm) river rock. You will also need an anchoring mechanism, such as a copper ground stake or a stainless steel carabiner to tie into a basin grate.
- Use a 5/16-inch (8 mm) drill bit and a cordless drill for installing a heavy-duty bottom anchor stake.
- Wear heavy leather work gloves to protect your hands from razor-sharp edges when cutting aluminum gutters.
- Avoid cheap, big-box store chains that mix dissimilar metals, as galvanic corrosion will cause them to snap within three years.
How Do You Connect the Rain Chain to the Gutter?
Here is a classic judgement call a pro makes differently from a beginner. A beginner will usually remove the aluminum downspout, lay a V-shaped wire across the bare, jagged hole, and hang the chain. Because the bare hole sits flush with the gutter floor, water creeps along the underside of the aluminum rather than flowing down the chain. A professional always installs a flanged reducer kit, frequently called an installation sleeve.
This copper or aluminum funnel drops down into the gutter hole with a wide lip sealed by polyurethane caulk, creating a physical drip edge that forces 100 percent of the water onto the first link of the chain. This simple $30 piece of hardware is the difference between a dry foundation and a flooded basement.
- Clean the gutter floor thoroughly around the drop outlet with a wire brush before attempting to apply any sealant.
- Use a marine-grade polyurethane sealant, never a cheap acrylic painter's caulk, to bed the flange securely.
- If the existing hole is too large for a standard reducer kit, install a flat copper patch with rivets and drill a new 2.25-inch (5.7 cm) hole.
How Do You Anchor the Bottom of a Rain Chain?
A massive failure mode with rain chain installation is leaving the bottom link to dangle freely above a splash block. A wet, swinging rain chain during a thunderstorm becomes a 15-pound (6.8 kg) metal whip that can dent aluminum siding, chip brick veneer, or shatter basement windows. To prevent this, you must anchor the bottom link under physical tension.
You can achieve this by driving a copper or galvanized steel landscape stake at least 12 inches (30.5 cm) into the ground directly beneath the chain. Alternatively, if you are draining into a catch basin, bolt the final link directly to the heavy cast-iron grate. The chain should feel taut when pulled horizontally.
- Measure your chain length so that the bottom link sits exactly 1 to 2 inches (2.5 to 5 cm) below the grate or resting point to ensure tension.
- Use heavy-duty UV-resistant zip ties or a stainless steel carabiner for an easy quick-release anchor when maintenance is required.
- Ensure the ground anchor point is perfectly plumb with the gutter drop hole; a slanted chain will cause water to drip off the sides prematurely.
How Do You Build a Gravel Drainage Basin?
Dumping roof water directly at the base of your foundation defeats the entire purpose of a gutter system. To safely manage the concentrated runoff from a rain chain, excavate a drainage basin directly beneath the anchor point. Dig a hole roughly 18 inches (45.7 cm) wide and 18 inches (45.7 cm) deep. Line the entire excavation with non-woven landscape fabric to prevent native soil migration from clogging the pit, then fill it with washed 3/4-inch (19 mm) river rock.
For homes with poor drainage or heavy clay soil, a simple rock pit is not enough. You must bury a perforated corrugated pipe wrapped in a drain sleeve at the bottom of this pit, sloping it downward at a 1/4-inch per foot (2 cm per meter) grade to carry the water at least 10 feet (3 m) away from your foundation.
- Never use pea gravel or crushed limestone for a drainage basin, as the small stones will wash away or compact into concrete during a heavy storm.
- Grade the topsoil surrounding the basin so that any severe storm overflow naturally slopes away from the house.
- Keep the top layer of river rock about 1 inch (2.5 cm) below the surrounding soil grade to naturally contain horizontal splashing.
Can You Direct a Rain Chain Into a Rain Barrel?
Rain chains pair exceptionally well with rain barrels, turning roof runoff into a sustainable, zero-cost irrigation source for your garden. The key to this pairing is ensuring the transition between the chain and the barrel is physically secure and mosquito-proof. Simply dropping the chain through an open hole invites organic debris accumulation and aggressive insect breeding.
Instead, cut a precise 3-inch (7.6 cm) hole in the barrel lid and install a fine stainless steel mesh screen. Anchor the bottom of the rain chain directly to the center of this screen using a heavy-duty toggle bolt or a specialized copper anchor pin. Because rain chains move high volumes of water rapidly, always install a rigid PVC overflow pipe near the top of the barrel to direct excess water safely away once the container reaches maximum capacity.
- Position the rain barrel on perfectly level concrete pavers so it does not sink into the soil when filled with 400 pounds (181 kg) of water.
- Scrub the stainless steel debris screen weekly during the autumn months to prevent wet leaf clogs from forcing water over the sides.
- Ensure your barrel overflow pipe is at least 1.5 inches (3.8 cm) in diameter to handle the flow rate of torrential downpours.
Do You Need to Remove Rain Chains Before Winter Freeze?
Homeowners in cold climates often wonder if they can safely leave their rain chains exposed year-round. In USDA Hardiness Zones 5 and below, leaving a rain chain up through winter is a significant risk to your roof's structural integrity. As snow melts off the roof and immediately refreezes, solid ice accumulates rapidly on the metal cups and links.
A standard 8.5-foot (2.6 m) chain coated in 2 inches (5 cm) of solid ice can weigh upwards of 80 pounds (36 kg). This immense static load can easily rip the aluminum gutter entirely off your fascia board. It is highly recommended to unhook the chain at the reducer flange in late November, snap in a temporary corrugated plastic downspout for the winter months, and reinstall the chain in the early spring.
- If you live in USDA Zones 6 through 9, your chain can generally remain installed year-round without risking severe ice accumulation.
- Never attempt to knock ice off a frozen rain chain with a hammer or mallet, as you will permanently dent the soft copper cups.
- Store your winterized rain chain in a dry, ventilated garage or shed; do not seal it in a plastic bag where trapped moisture could cause uneven green tarnishing.
| Feature | Cup-Style Chain | Link-Style Chain |
|---|---|---|
| Flow Capacity | High (processes over 1 inch per hour safely) | Low (best for light drizzle and slow melts) |
| Splash Radius | Minimal (water is contained within metal cups) | High (water sprays up to 3 feet in strong winds) |
| Wind Resistance | Moderate (heavier overall weight keeps it plumb) | Poor (swings easily, losing surface tension) |
| Ideal Location | Near foundations, entryways, and walkways | Over open garden beds or large water features |
Frequently asked questions
Can rain chains handle heavy, torrential downpours?
Yes, provided you install a cup-style chain rather than a link-style chain. A standard 3-inch (7.6 cm) wide copper cup chain can process over 1.5 inches (3.8 cm) of rainfall per hour from a typical 500-square-foot roof section without overflowing.
How long does it take for a copper rain chain to turn green?
The patination process heavily depends on your local climate and air salinity. In coastal regions, copper can develop a green patina in as little as three years. In dry, inland regions, it may take 10 to 15 years to transition fully from dark brown to green.
Can I install a rain chain on a house without gutters?
No. Rain chains require a concentrated flow of water to function properly. Without a gutter to catch and funnel the roof's runoff into a single drop hole, water will simply cascade off the roofline everywhere, ignoring the chain entirely.
Are rain chains noisy during a severe storm?
If properly anchored at the bottom, rain chains produce a very pleasant, rhythmic trickling sound similar to a garden water feature. They only become noisy and clanking if left unanchored to bang against the side of the house in the wind.
Keep reading
- How Much Paint Do You Actually Need for a Room?The tin says 400 square feet. Your wall says otherwise. Here is the arithmetic that actually holds up.
- DIY or Hire a Pro? A Decision Framework That Is Not About MoneyThe labour saving is real. So is the cost of a job done twice — and of tools you use once.
- Storage for Small Rooms That Does Not Make Them SmallerSmall rooms do not need more storage. They need storage that stops interrupting the eye.