How Do You Install a Mailbox Post That Survives Snowplows?
By Jim Vernon · 8 min read · Last updated
You don't have to spend every spring digging a shattered 4x4 out of the frozen mud.
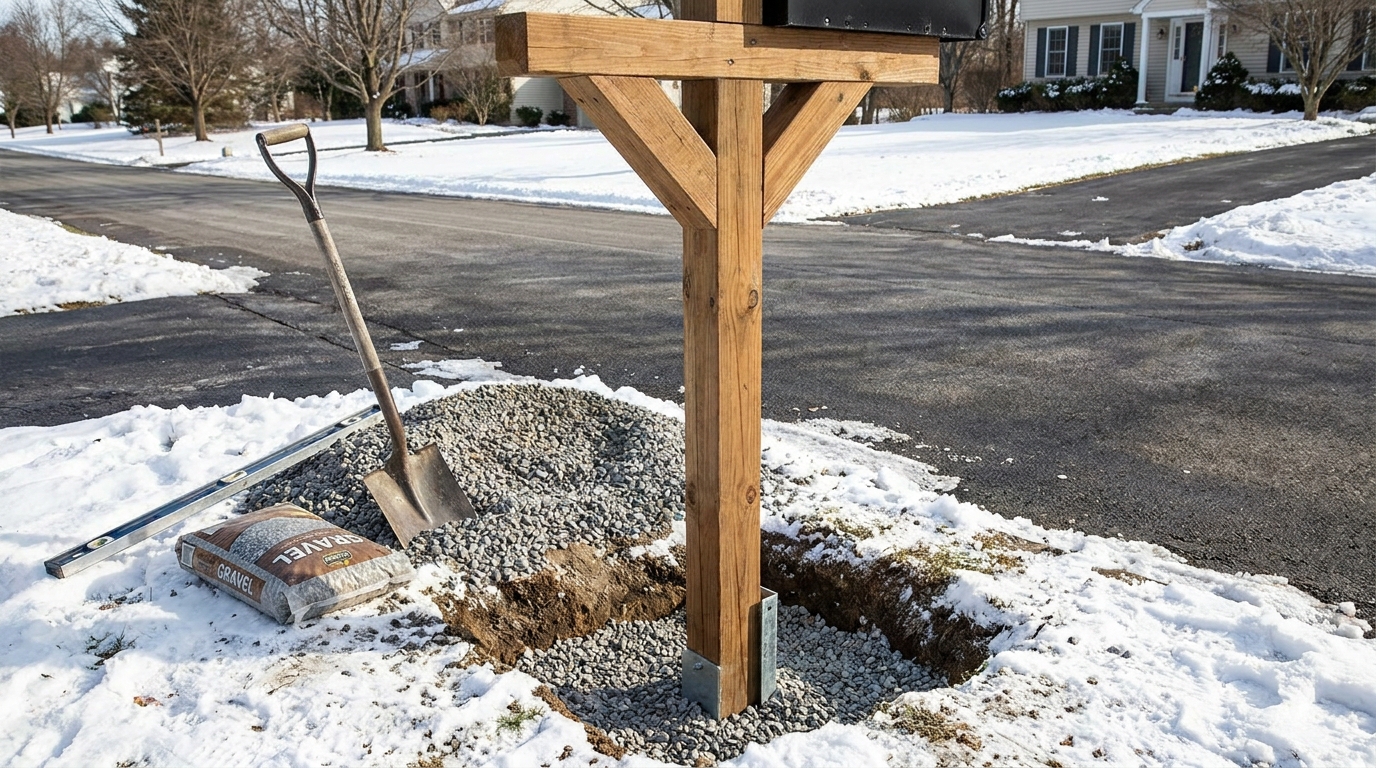
To install a snowplow-resistant mailbox post, bury a pressure-treated 4x4 wood post exactly 24 inches (61 cm) deep into a bed of compacted crushed gravel—not concrete—and use a metal mounting bracket to secure the box. Setting the wood in rigid concrete guarantees the post will snap at the soil line when struck by heavy, flying winter slush. By compacting angular gravel around the buried wood, the post can shift slightly backward upon impact, absorbing the blow so you can easily pull it back to plumb the next day. In 2026, the complete materials for this project—including a ground-contact treated pine post, two bags of crushed stone, galvanized hardware, and a standard metal box—will run you between $65 and $110, and the labor takes under two hours with a manual post-hole digger.
- Never use concrete to set a mailbox post in snow climates; rigid posts snap, while gravel-set posts flex.
- Federal guidelines require the bottom of the box to sit 41 to 45 inches (104 to 114 cm) above the road surface.
- Bury the post exactly 24 inches (61 cm) deep to avoid wind sway without creating a deadly, immovable roadside hazard.
- Seal the bottom end-grain of the wood before planting it to prevent premature soil rot.
- Use 3/4-inch (1.9 cm) angular crushed stone, avoiding smooth pea gravel that acts like ball bearings under pressure.
What Are the Legal Rules for Mailbox Height and Setback?
Before you dig a single inch of dirt, you must align your layout with the Federal Highway Administration (FHWA) and United States Postal Service (USPS) regulations. The bottom of the mailbox must hover between 41 and 45 inches (104 and 114 cm) above the surface of the road, not the surface of the grassy shoulder. If you have a raised curb, the front face of the mailbox must sit 6 to 8 inches (15 to 20 cm) back from the curb edge. If you live on a rural road without a curb, the face of the box should be 6 to 8 inches (15 to 20 cm) back from the edge of the pavement.
These dimensions are not just for the mail carrier's ergonomic comfort. A municipal wing plow is specifically designed to overhang the edge of the road by a few inches. If your box protrudes past that 6-inch (15 cm) setback margin, the steel plow blade will physically strike the box, destroying it instantly. By maintaining the proper setback, the box will only face the force of the heavy, flying slush—which a properly installed post can survive.
- Box height: 41 to 45 inches (104 to 114 cm) from the road surface.
- Box setback: 6 to 8 inches (15 to 20 cm) from the curb or pavement edge.
- Post location: Always mark utility lines by dialing 811 before digging.
Should You Use Concrete or Gravel for the Post Base?
This is the most critical judgement call of the entire project. A beginner will almost always drop their wood post into the hole and dump in 80 pounds (36 kg) of fast-setting concrete, assuming maximum rigidity equals maximum strength. A pro approaches this differently. They know you cannot win a battle of rigid strength against a 10-ton municipal plow truck hurling wet slush at 35 miles per hour (56 km/h). If the base is locked in concrete, all the kinetic energy of the slush impact transfers directly to the wood at the soil line, snapping the 4x4 cleanly in half.
Instead, professionals backfill the hole entirely with compacted, angular crushed stone. When the winter slush hits the mailbox, a gravel-set post will give way just a fraction of an inch, leaning back slightly to absorb the massive shockwave. In the spring, or even the next morning, you can simply push the post back to plumb and tamp the dirt around it with your boot. You trade a shattered post for a slightly leaning post that takes two seconds to fix.
- Concrete creates a hard shear line that causes wood to snap under impact.
- Compacted gravel absorbs shock, allowing the post to tilt instead of break.
- Gravel provides superior water drainage, significantly extending the life of the wood.
Which Wood Should You Choose for a Mailbox Post?
You need a material that is strong enough to hold up a box full of heavy catalogs but weak enough to break away if a vehicle actually leaves the road and strikes it. The FHWA explicitly bans unyielding supports like heavy steel pipes, railroad ties, or concrete columns because they are deadly in a car crash. The ideal material is a standard 4x4-inch (10x10 cm) wooden post made from pressure-treated pine, specifically rated for ground contact.
Never use a 6x6-inch (15x15 cm) post. While it looks visually impressive and rugged, a 6x6 does not meet federal breakaway safety standards and opens you up to severe liability if a driver hits it. A standard treated 4x4 is exactly what highway engineers recommend. If you prefer the look of cedar, you can slip a hollow cedar or vinyl sleeve over the structural treated pine base.
- Buy a 4x4-inch (10x10 cm) post rated for ground-contact (UC4A rating).
- Avoid 6x6-inch (15x15 cm) posts; they violate federal breakaway safety guidelines.
- Purchase an 84-inch (213 cm) long post to accommodate the 24-inch (61 cm) burial depth.
How Do You Dig and Prep the Hole?
A common failure mode for any ground-set wood post is base rot. This happens when the flat, porous bottom of the 4x4 sits directly on heavy clay soil, soaking up standing water like a sponge. To avoid this, you must control the drainage at the very bottom of the hole. Start by using a clamshell post-hole digger to excavate a hole exactly 26 inches (66 cm) deep and about 10 inches (25 cm) wide.
Once you hit your depth, pour 2 inches (5 cm) of crushed gravel directly into the bottom of the empty hole and tamp it flat with a heavy digging bar or scrap piece of wood. This creates a porous platform for the post to sit on, ensuring water always drains away from the vulnerable end-grain. Before you place the post in the hole, heavily coat the bottom cut end with a copper naphthenate wood preservative, which costs about $20 for a quart. This one extra step will add five to seven years to the life of the post.
- Dig 26 inches (66 cm) deep and backfill 2 inches (5 cm) of gravel for drainage.
- Keep the hole diameter relatively tight, roughly 10 inches (25 cm), to minimize disturbed soil.
- Coat the buried end of the post with a liquid copper wood preservative.
How Do You Lock the Post With Crushed Gravel?
Once your post is resting on the gravel bed, use a magnetic post level to ensure it is perfectly plumb on two adjacent sides. Do not use river rock, pea gravel, or any smooth stones to fill the hole. Smooth stones act like microscopic ball bearings and will never lock together, meaning your post will wobble every time you open the mailbox door. You must use 3/4-inch (1.9 cm) minus angular crushed stone, often sold as paver base or driveway gravel.
Pour the gravel into the hole in 4-inch (10 cm) intervals. After every addition, use the blunt end of a heavy digging bar to violently pack the gravel downward around the wood. This process, called compacting in lifts, causes the sharp edges of the stones to bite into the wood and interlock with each other. By the time you reach the soil line, the post will feel like it was set in concrete, but it will retain that vital, microscopic ability to flex when the snowplow wall of slush hits it.
- Use 3/4-inch (1.9 cm) angular crushed stone for the backfill.
- Never use smooth pea gravel, which will not compact or hold the post steady.
- Tamp the gravel heavily every 4 inches (10 cm) to create a locked, rigid matrix.
How Do You Secure the Mailbox Without Stripping Screws?
With the post firmly in the ground, it is time to attach the box itself. Never screw the metal mailbox directly into the top of the 4x4 using standard drywall or deck screws. The repetitive opening of the door and the weight of packages will strip the threads out of the pine within a single season. Instead, buy a galvanized steel or heavy-duty plastic mounting bracket designed specifically for your mailbox size.
Attach the mounting bracket to the post using 5/16-inch (0.8 cm) galvanized lag screws that are at least 2.5 inches (6.4 cm) long. You must pre-drill pilot holes for these lag screws to prevent the top of the 4x4 from splitting open. Once the bracket is locked down, place the metal mailbox over the bracket and secure it through the side flanges using the machine screws provided with the box. This creates a mechanical connection that will easily withstand the lateral force of flying ice.
- Use a steel or thick composite mounting board, not a scrap piece of plywood.
- Anchor the mount with 5/16-inch (0.8 cm) galvanized lag screws.
- Pre-drill the wood to prevent splitting the 4x4 at the very top.
| Backfill Material | Impact Resistance (Snowplow) | Drainage & Rot Prevention | Ease of Adjustment |
|---|---|---|---|
| Angular Crushed Gravel | Excellent (Flexes under impact) | Excellent (Water drains freely) | Easy (Just push and re-tamp) |
| Fast-Setting Concrete | Poor (Wood snaps at soil line) | Poor (Traps water against wood) | Impossible (Requires full excavation) |
| Native Soil / Dirt | Moderate (Will sag easily) | Poor (Clay holds water) | Moderate (Tamping dirt is messy) |
| Pea Gravel (Smooth) | Poor (Post will wobble constantly) | Good (Drains well) | Easy (But never holds plumb) |
Frequently asked questions
Can I use a metal drive-in post spike instead of digging a hole?
Metal drive-in spikes are fast but lack the stability required for a mailbox in a snow zone. The frost heaves in northern climates will push a 24-inch (61 cm) steel spike out of the ground within two winters, and the leverage of snowplow slush will bend the steel socket.
What is a cantilevered mailbox post, and do I need one?
A cantilevered post uses an angled wooden arm to hold the mailbox out toward the street while the vertical post is buried 2 to 3 feet (61 to 91 cm) further back into your yard. This is highly recommended for high-speed rural roads because the snowplow blade and the worst of the slush blast completely misses the vertical wood.
How do I fix a mailbox post that leans backward every winter?
If your post is set in gravel, simply wait for a day when the ground thaws above 40 degrees Fahrenheit (4 C). Push the post plumb from the front, then use a heavy bar to aggressively tamp the soil and gravel at the back of the hole to lock the new angle in place.
Are plastic or brick mailboxes allowed by the USPS?
Heavy brick, stone, or concrete column mailboxes are technically banned by the Federal Highway Administration because they are lethal roadside hazards. Heavy-duty plastic step-in posts are allowed, but they become extremely brittle in sub-zero temperatures and easily shatter when hit by ice chunks.
Keep reading
- How Much Paint Do You Actually Need for a Room?The tin says 400 square feet. Your wall says otherwise. Here is the arithmetic that actually holds up.
- DIY or Hire a Pro? A Decision Framework That Is Not About MoneyThe labour saving is real. So is the cost of a job done twice — and of tools you use once.
- Storage for Small Rooms That Does Not Make Them SmallerSmall rooms do not need more storage. They need storage that stops interrupting the eye.