How Do You Epoxy a Garage Floor So It Doesn't Peel Under Hot Tires?
By Jim Vernon · 9 min read · Last updated
If your car's tires can easily lift patches of your newly coated garage floor, you didn't apply epoxy—you just painted over dirt.
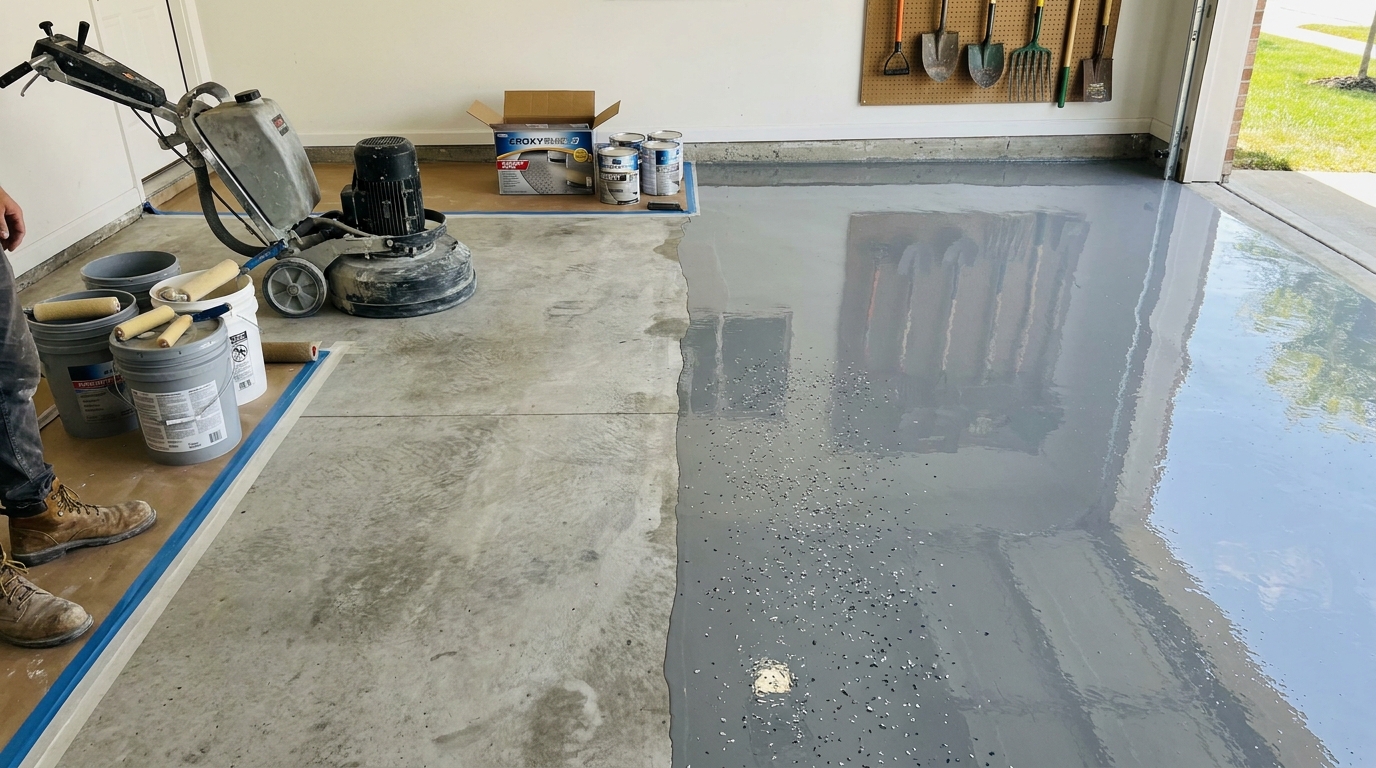
To stop a garage floor epoxy from peeling under hot tires, you must mechanically grind the concrete, patch all cracks with polyurea, apply a 100% solids epoxy base coat, broadcast decorative flakes to refusal, and seal it with a polyaspartic clear coat. Typical DIY kits fail because they rely on weak water-based epoxy and mild acid etching, leaving a thin film that easily bonds to heated rubber and tears right off the concrete. By renting a floor grinder and using professional-grade two-part resins, you can permanently bond the coating to the concrete pores. Expect this project to take three full days of heavy labor and cost between $600 and $1,200 in materials and rentals for a standard 400-square-foot (37.1-square-meter) two-car garage. When done correctly, the result is a chemical-resistant, UV-stable floor that will handle dropped wrenches, engine oil, and heavy trucks for decades.
- Rent a concrete floor grinder with diamond tooling to properly open the concrete pores instead of relying on muriatic acid washes.
- Use 100% solids epoxy rather than water-based kits to ensure a thick, durable base coat that withstands hot tire pickup.
- Repair cracks, divots, and spalling using a rapid-curing polyurea filler that won't shrink under the epoxy coat.
- Apply a UV-stable polyaspartic topcoat to prevent the epoxy from yellowing in sunlight and to maximize chemical resistance.
Why Do Most DIY Garage Epoxy Kits Fail So Quickly?
The most common failure mode for garage floors is "hot tire pickup." When you drive at highway speeds, your tires easily heat up to 140°F (60°C). When you park on a newly coated floor, the heat transfers into the epoxy, softening it slightly. As the tire cools, the rubber contracts and grips the coating. When you back out the next morning, the weak epoxy tears cleanly off the concrete, leaving bare gray patches.
To avoid this completely, you must abandon cheap, water-based epoxy kits sold at big-box stores. These kits shrink as the water evaporates, leaving a brittle film only 2 to 3 mils (0.05 to 0.07 mm) thick. Professional-grade 100% solids epoxy does not shrink during curing. It cures chemically to form a dense slab up to 10 to 15 mils (0.25 to 0.38 mm) thick, mechanically locking into the concrete so fiercely that the concrete itself will fracture before the epoxy peels.
- Water-based epoxies act like paint and sit on the surface.
- 100% solids epoxies sink into the pores and form a structural bond.
- Hot tires expand and contract, requiring a high-adhesion base coat to resist the pulling force.
How Do You Prep the Concrete Before Applying Epoxy?
The starkest judgment call separating a beginner from a professional is floor prep. A beginner will buy a $150 kit and spend an hour scrubbing the floor with muriatic acid. Acid etching only cleans the surface and rarely penetrates old oil stains or power-troweled, tightly sealed concrete. A professional ignores acid entirely and heads straight to the rental yard.
You must rent a 110-volt walk-behind concrete diamond grinder, equipped with a dust shroud and a heavy-duty HEPA vacuum. Grinding physically removes the top 1/16-inch (1.6-mm) of the slab, eliminating old sealers, oil stains, and tire marks. Your goal is to achieve a Concrete Surface Profile (CSP) of 2 or 3, which feels like 80-grit sandpaper. This rough texture gives the 100% solids epoxy the "tooth" it needs to grab hold forever.
- Sweep the garage and degrease heavy oil stains using a commercial degreaser and a stiff bristle brush.
- Grind the main floor using the walk-behind unit, moving slowly in overlapping rows.
- Use a 7-inch (17.8-cm) angle grinder with a diamond cup wheel to grind the edges and corners where the large machine cannot reach.
- Vacuum the entire floor three times to remove all silica dust before patching.
How Do You Repair Cracks and Pitting in the Floor?
Never use standard cement-based patching compounds under epoxy. Concrete patches shrink as they dry and lack the tensile strength to hold up under a rigid epoxy shell, leading to cracks that telegraph right through your new finish. Instead, use a two-part polyurea crack filler or an epoxy gel paste.
Use a margin trowel to force the polyurea deep into the cracks and divots, slightly overfilling them. Polyurea cures incredibly fast—often in just 15 to 30 minutes. Once it hardens, take your angle grinder with the diamond cup wheel and grind the patched areas perfectly flush with the surrounding concrete. If you can feel a ridge with your fingernail, you will see it through the final epoxy coat.
- Chase existing cracks with an angle grinder fitted with a V-blade to remove loose debris.
- Mix only small batches of polyurea at a time due to its rapid curing speed.
- Grind all patches flush so the floor is perfectly monolithic before coating.
What Is the Right Temperature and Moisture Level for Epoxy?
Epoxy is highly sensitive to climate. Do not attempt this project if the concrete slab temperature (not just the air temperature) is below 55°F (13°C) or above 80°F (27°C). If it's too cold, the epoxy will become thick like molasses and won't penetrate the concrete pores. If it's too hot, the pot life will drop from 45 minutes to 15 minutes, causing the resin to harden in the bucket before you can roll it out.
Moisture is the invisible killer of epoxy floors. Tape a 16-inch by 16-inch (40.6-cm by 40.6-cm) square of clear plastic sheeting tightly to the concrete using duct tape. Leave it for 24 hours. If condensation forms under the plastic, or the concrete looks darker than the surrounding floor, hydrostatic pressure is pushing water up through the slab. You must apply a specialized moisture vapor barrier epoxy primer before laying your base coat.
- Verify concrete temperature using a laser infrared thermometer.
- Never apply epoxy when rain is actively blowing into the garage, as high humidity can cause the coating to blush (turn cloudy).
- Perform the plastic sheet test in the center of the garage and near the exterior apron.
How Do You Mix and Apply the 100% Solids Epoxy Base Coat?
Mixing two-part epoxy is a race against the clock. Once you combine Part A (resin) and Part B (hardener), an exothermic reaction begins. Mix the parts in a clean bucket using a drill with a paddle attachment on low speed for exactly three minutes. Immediately pour the entire contents onto the floor in a long ribbon. If you leave it in the bucket, the concentrated heat will cause it to flash-cure and smoke within 10 minutes.
Have one person use a notched squeegee to pull the ribbon of epoxy evenly across the floor, spreading it to the correct thickness. A second person wearing spiked shoes must follow closely behind with an 18-inch (45.7-cm), 3/8-inch (9.5-mm) nap lint-free roller. The roller levels out the squeegee lines and forces the epoxy deep into the ground concrete pores.
- Keep a cut-in brush handy for edges along the walls and stem walls.
- Always keep a "wet edge" by overlapping the rolled sections to prevent visible seams.
- Never scrape the sides of the mixing bucket when pouring onto the floor; unmixed resin clinging to the bucket walls will leave permanent sticky spots.
How Do You Apply Flakes to the Epoxy?
While the base coat is still wet, you must apply the vinyl color flakes. For a professional, slip-resistant finish that hides dirt, you want a "full broadcast" or "broadcast to refusal." This means completely burying the wet epoxy in flakes until no liquid is visible. For a standard 400-square-foot (37.1-square-meter) garage, you will need at least 50 pounds (22.6 kg) of flakes.
Grab handfuls of flakes and toss them high into the air like you are feeding chickens, letting them rain down evenly into the wet epoxy. Do not throw them downward, or they will pile up in heavy mounds. Let the floor cure overnight. The next day, use a flat floor scraper to aggressively scrape the entire surface, knocking down all the sharp, vertical flakes. Sweep and vacuum up the excess flakes; you will usually recover about a third of what you threw.
- Wear your spiked shoes so you can walk on the wet epoxy while tossing flakes.
- Toss the flakes up toward the ceiling to ensure random, even dispersal.
- Do not skip the scraping step; un-scraped flakes will poke through your topcoat and slice bare feet.
How Do You Apply the Polyaspartic Clear Topcoat?
Standard epoxy is incredibly strong, but it is not UV-stable. If you leave epoxy exposed to the sunlight near your garage door, it will turn a sickly amber color within six months. To prevent this and add superior scratch resistance, you must seal the flaked floor with a polyaspartic or high-wear polyurethane clear topcoat.
Polyaspartic topcoats cure exceptionally fast. Mix only what you can spread in 15 to 20 minutes. Ribbon pour the clear coat onto the scraped, vacuumed flakes, squeegee it out, and back-roll it just like the base coat. The clear coat will soak into the flakes, locking them in and creating a high-gloss, slightly textured surface that is safe to walk on when wet. Allow the topcoat to cure for 24 hours before walking on it, and wait a full 72 hours before parking vehicles.
- Use a fresh 18-inch (45.7-cm) roller cover for the clear coat to prevent contamination.
- Maintain heavy cross-ventilation, as polyaspartic vapors are very strong.
- Wait a full 72 hours before driving on the surface, regardless of how dry it feels to the touch.
| Feature | Box Store DIY Kit | Pro-Grade Epoxy System |
|---|---|---|
| Preparation Method | Muriatic Acid Etch | Mechanical Diamond Grinding |
| Resin Composition | 50% Water / 50% Solids | 100% Solids |
| Cured Thickness | 2 to 3 mils (0.07 mm) | 10 to 15 mils (0.38 mm) |
| Flake Coverage | Light sprinkle (5 lbs / 2.2 kg) | Full broadcast to refusal (50 lbs / 22.6 kg) |
| Hot Tire Resistance | Poor to Moderate | Excellent (Permanent bond) |
Frequently asked questions
Can I epoxy over an old painted garage floor?
No. Epoxy must bond directly to the open pores of bare concrete. If you apply epoxy over old paint or weak sealers, your new floor is only as strong as the failing paint beneath it. You must grind the floor down to bare concrete.
Do I need to fill the expansion joints before applying epoxy?
Control joints (the straight cuts in your slab) are designed to let the concrete crack in a controlled line. While optional, filling them with polyurea and grinding them flush creates a seamless, easy-to-clean floor. Be aware that significant ground movement can cause a hairline crack over filled joints later.
How do I clean a fully cured epoxy floor?
Maintenance is simple. Sweep regularly with a dust mop, and wash the floor with 5 ounces (148 ml) of clear ammonia mixed into a gallon (3.8 liters) of hot water. Avoid using soap-based floor cleaners, as they leave a hazy residue on high-gloss polyaspartic topcoats.
What happens if a bug lands in the wet epoxy?
If you are doing a full flake broadcast, simply flake over the bug; you'll scrape it off the next day. If a bug lands in the final clear coat, leave it alone until the floor fully cures. You can gently buff it out later. Trying to fish it out of wet polyaspartic will create a noticeable crater.
Keep reading
- How Much Paint Do You Actually Need for a Room?The tin says 400 square feet. Your wall says otherwise. Here is the arithmetic that actually holds up.
- DIY or Hire a Pro? A Decision Framework That Is Not About MoneyThe labour saving is real. So is the cost of a job done twice — and of tools you use once.
- Storage for Small Rooms That Does Not Make Them SmallerSmall rooms do not need more storage. They need storage that stops interrupting the eye.